DIRECTV HR10-250 System Manual - Page 29
Composite A/V Output, Composite A/V cables. One Composite A/V cable is included with your HD DVR.
 |
View all DIRECTV HR10-250 manuals
Add to My Manuals
Save this manual to your list of manuals |
Page 29 highlights
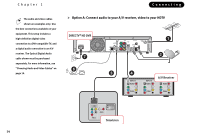
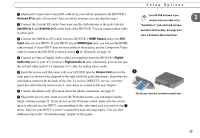
If your VCR or DVD recorder is already connected to your TV or A/V receiver for watching video tapes or DVDs, do not disconnect it. All you need to do to save recordings from your HD DVR is to connect standard audio and video from the HD DVR's outputs to the inputs on your VCR or DVD recorder. In the diagram to the left, Composite A/V cables send audio and video from the HD DVR to the VCR/DVD recorder, then from the VCR/DVD recorder to the TV. Your setup may look different, but the basic idea should be the same: high-definition video to your TV, digital audio to your A/V receiver, and standard audio/video to your VCR/DVD recorder. You may need to purchase additional cables for these connections, or you may be able to use cables that were included with your VCR or DVD recorder. This setup uses Composite A/V cables. One Composite A/V cable is included with your HD DVR. ᕡ First make connections from your satellite dish antenna, to your HD DVR, and to your HDTV and A/V receiver using the setup option shown on page 14. ᕢ Connect a Composite A/V cable from the HD DVR's Composite A/V Output jacks to the Composite A/V Input jacks on your VCR or DVD recorder. The HD DVR's video output format must be set to "480i" to send a signal from the Composite A/V jacks. ᕣ Your VCR or DVD recorder may already be connected to your TV (or A/V receiver). If so, you're done. If not, connect a Composite A/V cable from the VCR or DVD recorder's Composite A/V Output jacks to the Composite A/V Input jacks on your TV. To watch a video tape or DVD, change the input source on your TV to the input corresponding to the jacks you used in step ᕣ. Refer to your TV's documentation for help selecting the correct input. For information about saving programs to a VCR or DVD recorder, see page 81. Setup Options 1 This setup shows you how to connect a device such as a VCR or DVD recorder to your HD DVR. 19
-
 1
1 -
2
-
3
-
4
-
5
-
6
-
7
-
8
-
9
-
10
-
11
-
12
-
13
-
14
-
15
-
16
-
17
-
18
-
19
-
20
-
21
-
22
-
23
-
 24
24 -
 25
25 -
 26
26 -
 27
27 -
 28
28 -
 29
29 -
 30
30 -
 31
31 -
 32
32 -
 33
33 -
 34
34 -
35
-
36
-
37
-
38
-
39
-
40
-
41
-
42
-
43
-
44
-
45
-
46
-
47
-
48
-
49
-
50
-
51
-
52
-
53
-
54
-
55
-
56
-
57
-
58
-
59
-
60
-
61
-
62
-
63
-
64
-
65
-
66
-
67
-
68
-
69
-
70
-
71
-
72
-
73
-
74
-
75
-
76
-
77
-
78
-
79
-
80
-
81
-
82
-
83
-
84
-
85
-
86
-
87
-
88
-
89
-
90
-
91
-
92
-
93
-
94
-
95
-
96
-
97
-
98
-
99
-
100
-
101
-
102
-
103
-
104
-
105
-
106
-
107
-
108
-
109
-
110
-
111
-
112
-
113
-
114
-
115
-
116
-
117
-
118
-
119
-
120
-
121
-
122
-
123
-
124
-
125
-
126
-
127
-
128
-
129
-
130
-
131
-
132
-
133
-
134
-
135
-
136
-
137
-
138
-
139
-
140
-
141
-
142
-
143
-
144
-
145
-
146
-
147
-
148
-
149
-
150
-
151
-
152
-
153
-
154
-
155
-
156
-
157
-
158
-
159
-
160
-
161
-
162
-
163
-
164
-
165
-
166
-
167
-
168
-
169
-
170
-
171
-
172
-
173
-
174
-
175
-
176
-
177
-
178
-
179
-
180
-
181
-
182
-
183
-
184
-
185
-
186
-
187
-
188
 |
 |
