Dell 1420X User Guide - Page 21
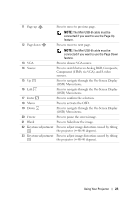
Press to toggle through Analog RGB, Composite, Component YPbPr via VGA, and S-video
 |
View all Dell 1420X manuals
Add to My Manuals
Save this manual to your list of manuals |
Page 21 highlights
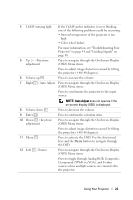
4 TEMP warning light If the TEMP amber indicator is on or blinking, one of the following problems could be occurring: • Internal temperature of the projector is too high • Color wheel failure For more information, see "Troubleshooting Your Projector" on page 44 and "Guiding Signals" on page 48. 5 Up / Keystone adjustment Press to navigate through the On-Screen Display (OSD) Menu items. Press to adjust image distortion caused by tilting the projector (+40/-40 degrees). 6 Volume up Press to increase the volume. 7 Right / Auto Adjust Press to navigate through the On-Screen Display (OSD) Menu items. Press to synchronize the projector to the input source. 8 Volume down 9 Enter 10 Down / Keystone adjustment 11 Menu 12 Left / Source NOTE: Auto Adjust does not operate if the on-screen display (OSD) is displayed. Press to decrease the volume. Press to confirm the selection item. Press to navigate through the On-Screen Display (OSD) Menu items. Press to adjust image distortion caused by tilting the projector (+40/-40 degrees). Press to activate the OSD. Use the directional keys and the Menu button to navigate through the OSD. Press to navigate through the On-Screen Display (OSD) Menu items. Press to toggle through Analog RGB, Composite, Component (YPbPr via VGA), and S-video sources when multiple sources are connected to the projector. Using Your Projector 21
-
 1
1 -
2
-
3
-
4
-
5
-
6
-
7
-
8
-
9
-
10
-
11
-
12
-
13
-
14
-
15
-
 16
16 -
 17
17 -
 18
18 -
 19
19 -
 20
20 -
 21
21 -
 22
22 -
 23
23 -
 24
24 -
 25
25 -
 26
26 -
27
-
28
-
29
-
30
-
31
-
32
-
33
-
34
-
35
-
36
-
37
-
38
-
39
-
40
-
41
-
42
-
43
-
44
-
45
-
46
-
47
-
48
-
49
-
50
-
51
-
52
-
53
-
54
-
55
-
56
-
57
-
58
-
59
-
60
-
61
-
62
-
63
 |
 |
