Dell 1420X User Guide - Page 23
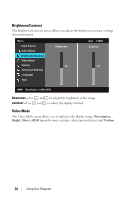
Press to switch between Analog RGB, Composite, Component YPbPr, via VGA, and S-video
 |
View all Dell 1420X manuals
Add to My Manuals
Save this manual to your list of manuals |
Page 23 highlights
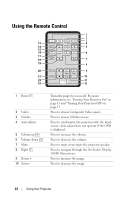
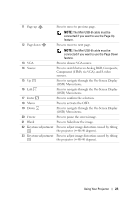
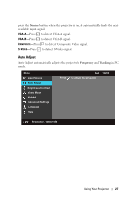
11 Page up Press to move to previous page. 12 Page down NOTE: The Mini USB-B cable must be connected if you want to use the Page Up feature. Press to move to next page. NOTE: The Mini USB-B cable must be connected if you want to use the Page Down feature. 13 VGA Press to choose VGA source. 14 Source Press to switch between Analog RGB, Composite, Component (YPbPr, via VGA), and S-video sources. 15 Up Press to navigate through the On-Screen Display (OSD) Menu items. 16 Left Press to navigate through the On-Screen Display (OSD) Menu items. 17 Enter Press to confirm the selection. 18 Menu Press to activate the OSD. 19 Down Press to navigate through the On-Screen Display (OSD) Menu items. 20 Freeze Press to pause the screen image. 21 Blank Press to hide/show the image. 22 Keystone adjustment Press to adjust image distortion caused by tilting the projector (+40/-40 degrees). 23 Keystone adjustment Press to adjust image distortion caused by tilting the projector (+40/-40 degrees). Using Your Projector 23
-
 1
1 -
2
-
3
-
4
-
5
-
6
-
7
-
8
-
9
-
10
-
11
-
12
-
13
-
14
-
15
-
16
-
17
-
 18
18 -
 19
19 -
 20
20 -
 21
21 -
 22
22 -
 23
23 -
 24
24 -
 25
25 -
 26
26 -
 27
27 -
 28
28 -
29
-
30
-
31
-
32
-
33
-
34
-
35
-
36
-
37
-
38
-
39
-
40
-
41
-
42
-
43
-
44
-
45
-
46
-
47
-
48
-
49
-
50
-
51
-
52
-
53
-
54
-
55
-
56
-
57
-
58
-
59
-
60
-
61
-
62
-
63
 |
 |
