Dell 8 Web Tools Administrator’s Guide - Page 265
Creating a security association, Peer Public Key filename
 |
View all Dell 8 manuals
Add to My Manuals
Save this manual to your list of manuals |
Page 265 highlights
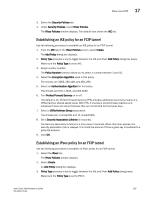
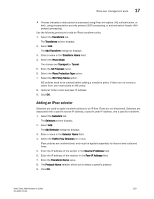
DRAFT: BROCADE CONFIDENTIAL IPsec over management ports 17 Use the following procedure to establish an IKE policy. 1. Select the IKE tab on the IPsec Policies window for Ethernet IPsec. The Add IKE Policy dialog box displays. 2. Enter an IKE Policy Name. 3. Enter the IP address of the authentication partner in the Peer IP Address field. 4. Enter the switch's local identifier in the Local Identifier field. This is normally the IP address in IPv4 or IPv6 format, but it may also be a DNS name. 5. Enter the identifier of the remote peer switch in Peer Identifier. This is normally the IP address in IPv4 or IPv6 format, but it may also be a DNS name. 6. Select the Encryption Algorithm option. 7. Select the Hash Algorithm option. 8. Select the PRF Algorithm option. 9. Select the DH Group Number option. 10. Select the Authentication Method option. 11. If PSK is chosen as the authentication method, enter the name of the file that holds the pre-shared key in the Pre-Shared Key filename field. 12. If you are using an X.509 certificate for authentication, enter the appropriate file names in the Public Key filename, Private Key filename, and Peer Public Key filename fields in PEM format. 13. Use the PFS selector to turn Perfect Forward Secrecy (PFS) on or off. PFS provides additional security by means of a Diffie-Hellman shared secret value. With PFS, if one key is compromised, previous and subsequent keys are secure because they are not derived from previous keys. Creating a security association A security association (SA) describes a set of parameters for providing secure communications between two endpoints. Use the following procedure to create a security association. 1. Select the IPsec tab. The IPsec Policies screen displays. 2. Select the SA tab. 3. Select Add. The Add SA dialog box displays. 4. Enter a name for the SA in the SA Name field. 5. Select the IPsec Protocol. option. The choices are ah (for authentication header) and esp (for encapsulated security protocol). 6. Select the Authentication Algorithm option. 7. Select the Encryption Algorithm option. Web Tools Administrator's Guide 237 53-1001772-01
-
 1
1 -
2
-
3
-
4
-
5
-
6
-
7
-
8
-
9
-
10
-
11
-
12
-
13
-
14
-
15
-
16
-
17
-
18
-
19
-
20
-
21
-
22
-
23
-
24
-
25
-
26
-
27
-
28
-
29
-
30
-
31
-
32
-
33
-
34
-
35
-
36
-
37
-
38
-
39
-
40
-
41
-
42
-
43
-
44
-
45
-
46
-
47
-
48
-
49
-
50
-
51
-
52
-
53
-
54
-
55
-
56
-
57
-
58
-
59
-
60
-
61
-
62
-
63
-
64
-
65
-
66
-
67
-
68
-
69
-
70
-
71
-
72
-
73
-
74
-
75
-
76
-
77
-
78
-
79
-
80
-
81
-
82
-
83
-
84
-
85
-
86
-
87
-
88
-
89
-
90
-
91
-
92
-
93
-
94
-
95
-
96
-
97
-
98
-
99
-
100
-
101
-
102
-
103
-
104
-
105
-
106
-
107
-
108
-
109
-
110
-
111
-
112
-
113
-
114
-
115
-
116
-
117
-
118
-
119
-
120
-
121
-
122
-
123
-
124
-
125
-
126
-
127
-
128
-
129
-
130
-
131
-
132
-
133
-
134
-
135
-
136
-
137
-
138
-
139
-
140
-
141
-
142
-
143
-
144
-
145
-
146
-
147
-
148
-
149
-
150
-
151
-
152
-
153
-
154
-
155
-
156
-
157
-
158
-
159
-
160
-
161
-
162
-
163
-
164
-
165
-
166
-
167
-
168
-
169
-
170
-
171
-
172
-
173
-
174
-
175
-
176
-
177
-
178
-
179
-
180
-
181
-
182
-
183
-
184
-
185
-
186
-
187
-
188
-
189
-
190
-
191
-
192
-
193
-
194
-
195
-
196
-
197
-
198
-
199
-
200
-
201
-
202
-
203
-
204
-
205
-
206
-
207
-
208
-
209
-
210
-
211
-
212
-
213
-
214
-
215
-
216
-
217
-
218
-
219
-
220
-
221
-
222
-
223
-
224
-
225
-
226
-
227
-
228
-
229
-
230
-
231
-
232
-
233
-
234
-
235
-
236
-
237
-
238
-
239
-
240
-
241
-
242
-
243
-
244
-
245
-
246
-
247
-
248
-
249
-
250
-
251
-
252
-
253
-
254
-
255
-
256
-
257
-
258
-
259
-
 260
260 -
 261
261 -
 262
262 -
 263
263 -
 264
264 -
 265
265 -
 266
266 -
 267
267 -
 268
268 -
 269
269 -
 270
270 -
271
-
272
-
273
-
274
-
275
-
276
-
277
-
278
-
279
-
280
-
281
-
282
-
283
-
284
-
285
-
286
-
287
-
288
-
289
-
290
-
291
-
292
-
293
-
294
-
295
-
296
-
297
-
298
-
299
-
300
-
301
-
302
-
303
-
304
-
305
-
306
-
307
-
308
-
309
-
310
 |
 |