Dell 928 All In One Inkjet Printer User Guide - Page 11
Print Files Mode, Scan Mode, Print files
 |
View all Dell 928 All In One Inkjet Printer manuals
Add to My Manuals
Save this manual to your list of manuals |
Page 11 highlights
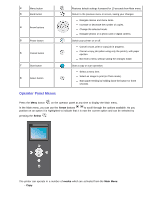
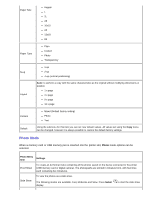
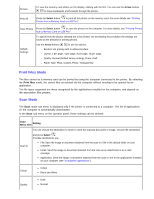
Browse To view the memory card photos on the display, starting with the first. You can use the Arrow buttons to move backwards and forwards through the photos. Print All Press the Select button to print all the photos on the memory card. For more details see "Printing Photos from a Memory Card or USB Pen". Save Photos Press the Select button to save the photos on the computer. For more details, see "Printing Photos from a Memory Card or USB Pen". To specify how the photos selected are to be printed. On terminating the procedure the settings are saved as the defaults for printing photos. Default Settings Use the Arrow buttons to set the options: Borders: set printing with or without borders. Layout: 1 per page, 4 per page, 9 per page, 16 per page. Quality: Normal (Default factory setting), Photo, Draft. Paper Type: Plain, Coated, Photo, Transparency. Print Files Mode The files stored on a memory card can be printed by using the computer connected to the printer. By selecting the Print files mode, the stored files are printed via the computer without needing to be opened by an application. The file types supported are those recognised by the applications installed on the computer, and depend on the association files present. Scan Mode The Scan mode sub menu is displayed only if the printer is connected to a computer. The list of applications on the computer is automatically downloaded. In the Scan sub menu on the operator panel, these settings can be defined: Scan Menu Item Setting You can choose the destination to which to send the scanned document or image. Choose the destination Scan to and press Select . Possible destinations are: File: Save the image or document obtained from the scan in a file in the default folder on your computer. Email: Send the image or document obtained from the scan as an attachment in an e-mail message. Application: Send the image or document obtained from the scan to one of the applications installed on your computer (see "Compatible applications"). Colour Colour Black and White Quality Draft Normal
-
 1
1 -
2
-
3
-
4
-
5
-
 6
6 -
 7
7 -
 8
8 -
 9
9 -
 10
10 -
 11
11 -
 12
12 -
 13
13 -
 14
14 -
 15
15 -
 16
16 -
17
-
18
-
19
-
20
-
21
-
22
-
23
-
24
-
25
-
26
-
27
-
28
-
29
-
30
-
31
-
32
-
33
-
34
-
35
-
36
-
37
-
38
-
39
-
40
-
41
-
42
-
43
-
44
-
45
-
46
-
47
-
48
-
49
-
50
-
51
-
52
-
53
-
54
-
55
-
56
-
57
-
58
-
59
-
60
-
61
-
62
-
63
-
64
-
65
-
66
-
67
-
68
-
69
-
70
-
71
 |
 |
