Dell 928 All In One Inkjet Printer User Guide - Page 50
How to Set Parameters to Improve Photo Print Quality
 |
View all Dell 928 All In One Inkjet Printer manuals
Add to My Manuals
Save this manual to your list of manuals |
Page 50 highlights
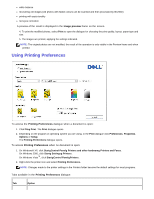
Photocopier · Define the copy quality. · Lighten or darken the copy, and select a B/W or colour copy. · Select the layout for the copy to be printed. · Enlarge or reduce the document or photo to copy, or automatically adjust its size to fit the paper format selected. · Select the number of copies. Scan to Set the destination for the scanned image, deciding whether to send it to an application, to a file or via e-mail. You can also access productivity tools. Search the hard disk or memory of the non-PictBridge/DPOF digital camera connected to the computer for folders containing photos to print. Mass storage file transfer Order ink Settings Connect to the internet, or receive information on how to obtain printer consumables. Set default parameter values for the functions provided by the program: Print photos, Photocopier, Scan to. Solutions and Assistance Access information on problem solving and maintenance. · Cleaning and checking ink cartridges. · Automatically aligning ink cartridges. See "Aligning Ink Cartridges". · Purchasing new ink cartridges from Dell™. Help Consult the online help for information on how to use the software. The online help is contextual and explains in detail how to complete the parameter settings that appear in dialogue boxes. To activate, click the Help button. To access the AIO Center: Click Startg Programs or All Programsg Dell Printersg All-In-One Centerg All-In-One Center. The AIO Center opens. The AIO Center provides access to all the printer functions that can be activated by clicking on the related icons. How to Set Parameters to Improve Photo Print Quality 1. From the AIO Center, select Print photos. Using this window you can print rapidly the photos saved on the computer, or apply correction filters before printing. 2. Select the photos to print after applying a correction filter. 3. Apply the correction filter you want by clicking on its associated check box. The filters available are: contrast enhancement border sharpening
-
 1
1 -
2
-
3
-
4
-
5
-
6
-
7
-
8
-
9
-
10
-
11
-
12
-
13
-
14
-
15
-
16
-
17
-
18
-
19
-
20
-
21
-
22
-
23
-
24
-
25
-
26
-
27
-
28
-
29
-
30
-
31
-
32
-
33
-
34
-
35
-
36
-
37
-
38
-
39
-
40
-
41
-
42
-
43
-
44
-
 45
45 -
 46
46 -
 47
47 -
 48
48 -
 49
49 -
 50
50 -
 51
51 -
 52
52 -
 53
53 -
 54
54 -
 55
55 -
56
-
57
-
58
-
59
-
60
-
61
-
62
-
63
-
64
-
65
-
66
-
67
-
68
-
69
-
70
-
71
 |
 |
