Dell 948 User Guide - Page 33
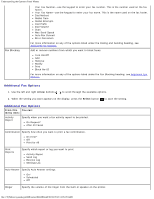
Additional Fax Options, Specify Auto Answer settings.
 |
View all Dell 948 manuals
Add to My Manuals
Save this manual to your list of manuals |
Page 33 highlights
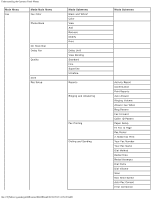
Understanding the Operator Panel Menus Fax Blocking Your Fax Number-use the keypad to enter your fax number. This is the number used on the fax footer. Your Fax Name-use the keypad to enter your fax name. This is the name used on the fax footer. Dial Method Redial Time Redial Attempts Dial Prefix Dial Volume Scan Max Send Speed Auto Fax Convert Error Correction For more information on any of the options listed under the Dialing and Sending heading, see Additional Fax Options. Add or remove numbers from which you want to block faxes. Turn On/Off Add Remove Modify Print Block No-ID For more information on any of the options listed under the Fax Blocking heading, see Additional Fax Options . Additional Fax Options 1. Use the left and right Arrow buttons to scroll through the available options. 2. When the setting you want appears on the display, press the Select button to save the setting. Additional Fax Options From this You can: menu item: Activity Report Specify when you want a fax activity report to be printed. On Request* After 40 Faxes Confirmation Specify how often you want to print a fax confirmation. On Error* Off Print for All Print Reports Specify which report or log you want to print. Activity Report Send Log Receive Log Settings List Auto Answer Specify Auto Answer settings. On* Scheduled Off Ringer Specify the volume of the ringer from the built-in speaker on the printer. file:///T|/htdocs/systems/prn948/en/en/d0e648.html[10/10/2012 11:05:28 AM]
-
 1
1 -
2
-
3
-
4
-
5
-
6
-
7
-
8
-
9
-
10
-
11
-
12
-
13
-
14
-
15
-
16
-
17
-
18
-
19
-
20
-
21
-
22
-
23
-
24
-
25
-
26
-
27
-
 28
28 -
 29
29 -
 30
30 -
 31
31 -
 32
32 -
 33
33 -
 34
34 -
 35
35 -
 36
36 -
 37
37 -
 38
38 -
39
-
40
-
41
-
42
-
43
-
44
-
45
-
46
-
47
-
48
-
49
-
50
-
51
-
52
-
53
-
54
-
55
-
56
-
57
-
58
-
59
-
60
-
61
-
62
-
63
-
64
-
65
-
66
-
67
-
68
-
69
-
70
-
71
-
72
-
73
-
74
-
75
-
76
-
77
-
78
-
79
-
80
-
81
-
82
-
83
-
84
-
85
-
86
-
87
-
88
-
89
-
90
-
91
-
92
-
93
-
94
-
95
-
96
-
97
-
98
-
99
-
100
-
101
-
102
-
103
-
104
-
105
-
106
-
107
-
108
-
109
-
110
-
111
-
112
-
113
-
114
-
115
-
116
-
117
-
118
-
119
-
120
-
121
-
122
-
123
-
124
-
125
-
126
-
127
-
128
-
129
-
130
-
131
-
132
-
133
-
134
-
135
-
136
-
137
-
138
-
139
-
140
-
141
-
142
-
143
-
144
 |
 |