Dell C1760NW Color Laser Printer User Guide - Page 178
Preferences, Order, Order Supplies button
 |
View all Dell C1760NW Color Laser Printer manuals
Add to My Manuals
Save this manual to your list of manuals |
Page 178 highlights
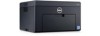
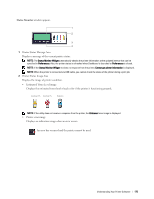
3 Info (i) button Click this button to open Preferences. NOTE: The Info (i) button appears on the lower-right corner of the window when the cursor is over the Status Monitor window. Printer Status Update Interval SNMP Community Name Service Tag button done button Displays a list of available printer names in the drop-down list. The first printer displayed in this list is set as default. You can update the interval of the printer status. By default, it is set to obtain the printer information every 10 seconds. The range varies between 0 and 600. You can change the SNMP (Simple Network Management Protocol) community name if using default community name (public). Up to 31 characters can be entered. Click Get Tag to obtain the service tag. Click this button to return to the Printer Status window. 4 Order Supplies button Click this button to display the Order window. This window provides you with the information for ordering printer supplies by telephone or from the web site. NOTE: The Order window automatically appears when low toner is detected. Order Online Select a web address from the drop-down list and click Visit Dell printer supplies ordering web site. hyperlink to access the web site for ordering Dell printer supplies. Order By Phone Displays a list of available phone numbers that you can call to order Dell printer supplies. Dell and the Environment Click the hyperlink to access the web site about recycling. 176 Understanding Your Printer Software
-
 1
1 -
2
-
3
-
4
-
5
-
6
-
7
-
8
-
9
-
10
-
11
-
12
-
13
-
14
-
15
-
16
-
17
-
18
-
19
-
20
-
21
-
22
-
23
-
24
-
25
-
26
-
27
-
28
-
29
-
30
-
31
-
32
-
33
-
34
-
35
-
36
-
37
-
38
-
39
-
40
-
41
-
42
-
43
-
44
-
45
-
46
-
47
-
48
-
49
-
50
-
51
-
52
-
53
-
54
-
55
-
56
-
57
-
58
-
59
-
60
-
61
-
62
-
63
-
64
-
65
-
66
-
67
-
68
-
69
-
70
-
71
-
72
-
73
-
74
-
75
-
76
-
77
-
78
-
79
-
80
-
81
-
82
-
83
-
84
-
85
-
86
-
87
-
88
-
89
-
90
-
91
-
92
-
93
-
94
-
95
-
96
-
97
-
98
-
99
-
100
-
101
-
102
-
103
-
104
-
105
-
106
-
107
-
108
-
109
-
110
-
111
-
112
-
113
-
114
-
115
-
116
-
117
-
118
-
119
-
120
-
121
-
122
-
123
-
124
-
125
-
126
-
127
-
128
-
129
-
130
-
131
-
132
-
133
-
134
-
135
-
136
-
137
-
138
-
139
-
140
-
141
-
142
-
143
-
144
-
145
-
146
-
147
-
148
-
149
-
150
-
151
-
152
-
153
-
154
-
155
-
156
-
157
-
158
-
159
-
160
-
161
-
162
-
163
-
164
-
165
-
166
-
167
-
168
-
169
-
170
-
171
-
172
-
 173
173 -
 174
174 -
 175
175 -
 176
176 -
 177
177 -
 178
178 -
 179
179 -
 180
180 -
 181
181 -
 182
182 -
 183
183 -
184
-
185
-
186
-
187
-
188
-
189
-
190
-
191
-
192
-
193
-
194
-
195
-
196
-
197
-
198
-
199
-
200
-
201
-
202
-
203
-
204
-
205
-
206
-
207
-
208
-
209
-
210
-
211
-
212
-
213
-
214
-
215
-
216
-
217
-
218
-
219
-
220
-
221
-
222
-
223
-
224
-
225
-
226
-
227
-
228
-
229
-
230
-
231
-
232
-
233
-
234
-
235
-
236
-
237
-
238
-
239
-
240
 |
 |