Dell C1760NW Color Laser Printer User Guide - Page 180
S/W Download
 |
View all Dell C1760NW Color Laser Printer manuals
Add to My Manuals
Save this manual to your list of manuals |
Page 180 highlights
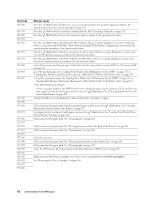
Error-Code 016-746 016-799 016-920 016-921 016-922 016-923 016-924 024-360 024-914 024-969 027-452 027-446 075-100 075-921 077-100 077-101 077-102 077-104 077-105 077-300 077-900 077-901 092-310 092-910 093-423 093-424 093-425 093-426 What you can do Press the (Set) button. Enable S/W Download and execute the operation again according to the operation procedure. See "Secure Settings" on page 138. Press the (Set) button to cancel the current print job. See "Canceling a Print Job" on page 170. Press the (Set) button. Execute the operation again according to the operation procedure. Press the (Set) button. Check that no other wireless LAN access point (Registrar) or router is setting up wireless connection with WPS-PBC (Wi-Fi Protected Setup®-Push Button Configuration), and execute the operation again according to the operation procedure. Press the (Set) button. Check the passphrase for the wireless LAN access point (Registrar) or router and execute the operation again according to the operation procedure. Press the (Set) button. Check the WEP key for the wireless LAN access point (Registrar) or router and execute the operation again according to the operation procedure. Turn off the printer, and then on again. If this does not solve the problem, contact Dell. See "Contacting Dell" on page 230. Load the specified paper. See "Loading Print Media in the Multipurpose Feeder (MPF)" on page 151 or "Loading Print Media in the Priority Sheet Inserter (PSI) (Dell C1760nw Color Printer only)" on page 159. • Load the appropriate paper. See "Loading Print Media in the Multipurpose Feeder (MPF)" on page 151 or "Loading Print Media in the Priority Sheet Inserter (PSI) (Dell C1760nw Color Printer only)" on page 159. • For Dell C1660w Color Printer: If there are paper loaded in the MPF and this error is displayed, paper may be jammed. Check and clear the paper path, load the specified paper, and then press the (Set) button. See "Clearing Paper Jams From the Front of the Printer" on page 203. Change IP address to avoid duplication. Turn off the printer, and then on again. Check and clear the paper path, load the specified paper, and then press the (Set) button. See "Clearing Paper Jams From the Front of the Printer" on page 203. Load paper for the second side (odd) pages, and press the (Set) button. See "Loading Print Media When Manual Duplex Printing" on page 164. Check and clear the paper path. See "Clearing Jams" on page 201. Check and clear the paper path. See "Clearing Paper Jams From the Back of the Printer" on page 204. Check and clear the paper path. See "Clearing Jams" on page 201. Close the rear cover. Check and clear the paper path. See "Clearing Paper Jams From the Output Tray" on page 206. Check and clear the paper path. See "Clearing Jams" on page 201. Clean the CTD sensor. See "Cleaning the Color Toner Density (CTD) Sensor" on page 195. Replace the specified toner cartridge soon. Order a new consumable from www.dell.com/supplies See "Removing the Toner Cartridges" on page 188. 178 Understanding Printer Messages
-
 1
1 -
2
-
3
-
4
-
5
-
6
-
7
-
8
-
9
-
10
-
11
-
12
-
13
-
14
-
15
-
16
-
17
-
18
-
19
-
20
-
21
-
22
-
23
-
24
-
25
-
26
-
27
-
28
-
29
-
30
-
31
-
32
-
33
-
34
-
35
-
36
-
37
-
38
-
39
-
40
-
41
-
42
-
43
-
44
-
45
-
46
-
47
-
48
-
49
-
50
-
51
-
52
-
53
-
54
-
55
-
56
-
57
-
58
-
59
-
60
-
61
-
62
-
63
-
64
-
65
-
66
-
67
-
68
-
69
-
70
-
71
-
72
-
73
-
74
-
75
-
76
-
77
-
78
-
79
-
80
-
81
-
82
-
83
-
84
-
85
-
86
-
87
-
88
-
89
-
90
-
91
-
92
-
93
-
94
-
95
-
96
-
97
-
98
-
99
-
100
-
101
-
102
-
103
-
104
-
105
-
106
-
107
-
108
-
109
-
110
-
111
-
112
-
113
-
114
-
115
-
116
-
117
-
118
-
119
-
120
-
121
-
122
-
123
-
124
-
125
-
126
-
127
-
128
-
129
-
130
-
131
-
132
-
133
-
134
-
135
-
136
-
137
-
138
-
139
-
140
-
141
-
142
-
143
-
144
-
145
-
146
-
147
-
148
-
149
-
150
-
151
-
152
-
153
-
154
-
155
-
156
-
157
-
158
-
159
-
160
-
161
-
162
-
163
-
164
-
165
-
166
-
167
-
168
-
169
-
170
-
171
-
172
-
173
-
174
-
 175
175 -
 176
176 -
 177
177 -
 178
178 -
 179
179 -
 180
180 -
 181
181 -
 182
182 -
 183
183 -
 184
184 -
 185
185 -
186
-
187
-
188
-
189
-
190
-
191
-
192
-
193
-
194
-
195
-
196
-
197
-
198
-
199
-
200
-
201
-
202
-
203
-
204
-
205
-
206
-
207
-
208
-
209
-
210
-
211
-
212
-
213
-
214
-
215
-
216
-
217
-
218
-
219
-
220
-
221
-
222
-
223
-
224
-
225
-
226
-
227
-
228
-
229
-
230
-
231
-
232
-
233
-
234
-
235
-
236
-
237
-
238
-
239
-
240
 |
 |