Dell Force10 S55T Quick Start Guide - Page 8
PSU and the outside of the chassis.
 |
View all Dell Force10 S55T manuals
Add to My Manuals
Save this manual to your list of manuals |
Page 8 highlights
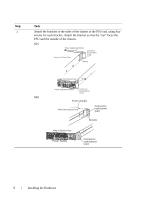
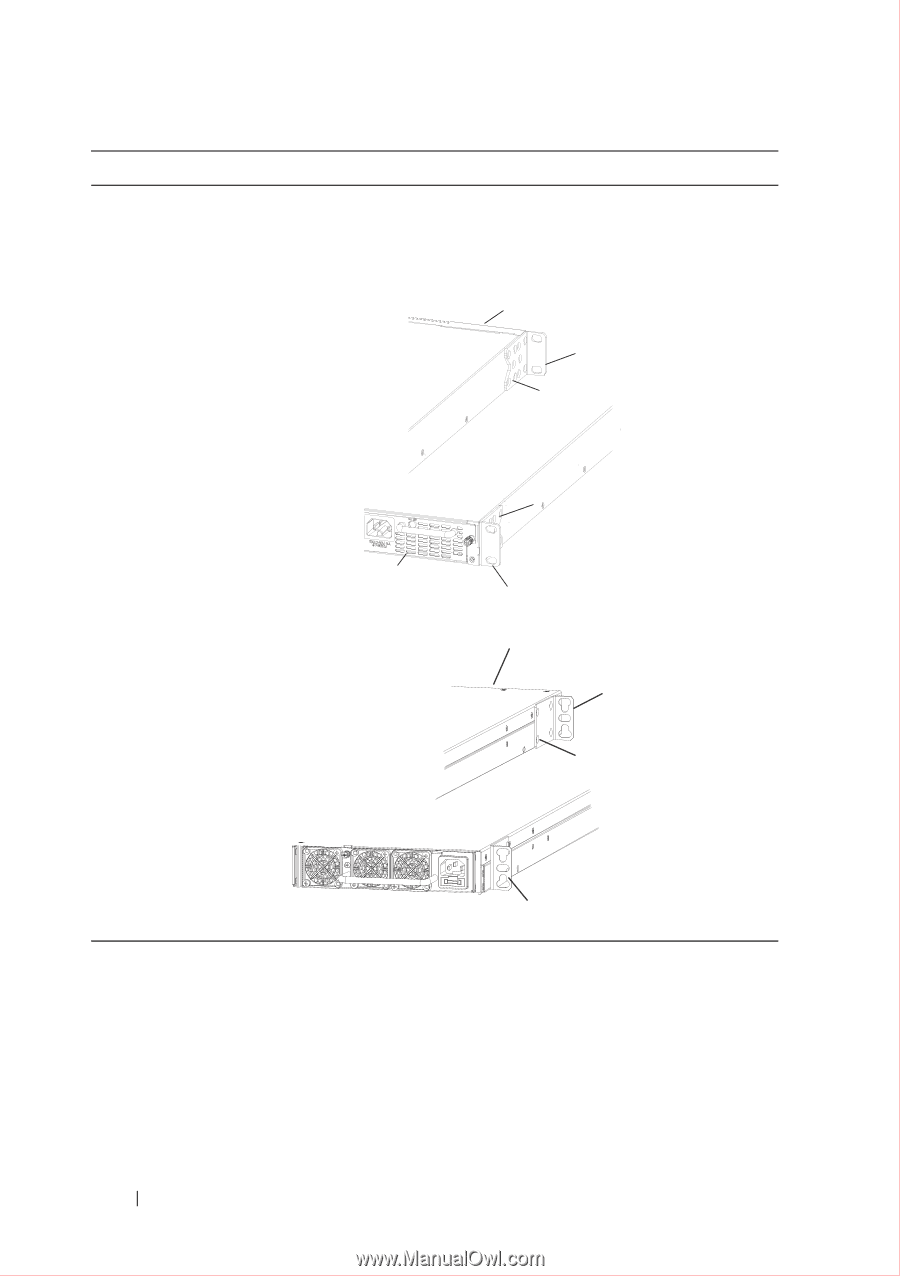
Step 2 Task Attach the brackets to the sides of the chassis at the PSU end, using four screws for each bracket. Attach the bracket so that the "ear" faces the PSU and the outside of the chassis. S55 Power Supply/Fan Module View from Chassis Rear Connect to Rack/Cabinet (ears) Screws S60 View from Chassis Front Screws Power Supply/Fan Module Connect to Rack/Cabinet (ears) Power Supply View from chassis rear Connect to rack/cabinet (ear) Screws View of chassis front Power Supply Connect to rack/cabinet (ear) 6 Installing the Hardware
-
 1
1 -
2
-
 3
3 -
 4
4 -
 5
5 -
 6
6 -
 7
7 -
 8
8 -
 9
9 -
 10
10 -
 11
11 -
 12
12 -
 13
13 -
14
-
15
-
16
-
17
-
18
-
19
-
20
-
21
-
22
-
23
-
24
-
25
-
26
-
27
-
28
 |
 |
6
Installing the Hardware
2
Attach the brackets to the sides of the chassis at the PSU end, using four
screws for each bracket. Attach the bracket so that the “ear” faces the
PSU and the outside of the chassis.
S55
S60
Step
Task
Power Supply/Fan Module
View from Chassis Rear
View from Chassis Front
Screws
Connect to
Rack/Cabinet
(ears)
Connect to
Rack/Cabinet
(ears)
Screws
Power Supply/Fan Module
Power Supply
Power Supply
Screws
Connect to
rack/cabinet
(ear)
Connect to
rack/cabinet
(ear)
View of chassis front
View from chassis rear