Dell Force10 S55T Quick Start Guide - Page 9
Install Chassis into Rack or Cabinet, Attach a Ground Cable to the System
 |
View all Dell Force10 S55T manuals
Add to My Manuals
Save this manual to your list of manuals |
Page 9 highlights
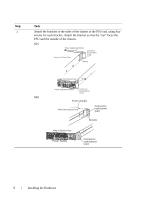
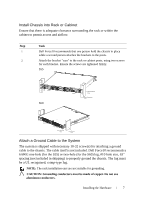
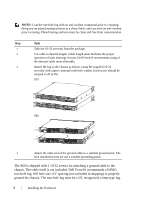
Install Chassis into Rack or Cabinet Ensure that there is adequate clearance surrounding the rack or within the cabinet to permit access and airflow. Step Task 1 Dell Force10 recommends that one person hold the chassis in place while a second person attaches the brackets to the posts. 2 Attach the bracket "ears" to the rack or cabinet posts, using two screws for each bracket. Ensure the screws are tightened firmly. S55 PSU0 S60 PSU1 Rack/Cabinet Post Rack Mounting ears PSU0 PSU1 Rack Mounting "ears" Rack/Cabinet Post Attach a Ground Cable to the System The system is shipped with necessary 10-32 screw(s) for attaching a ground cable to the chassis. The cable itself is not included. Dell Force10 recommends a 6AWG one-hole (for the S55) or two-hole (for the S60) lug, #10 hole size, 63" spacing (not included in shipping) to properly ground the chassis. The lug must be a UL recognized, crimp-type lug. NOTE: The rack installation ears are not suitable for grounding. CAUTION: Grounding conductors must be made of copper. Do not use aluminum conductors. Installing the Hardware 7
-
 1
1 -
2
-
3
-
 4
4 -
 5
5 -
 6
6 -
 7
7 -
 8
8 -
 9
9 -
 10
10 -
 11
11 -
 12
12 -
 13
13 -
 14
14 -
15
-
16
-
17
-
18
-
19
-
20
-
21
-
22
-
23
-
24
-
25
-
26
-
27
-
28
 |
 |
