Dell Inspiron 3200 Service Manual - Page 96
-Inch LCD Inverter Board, Inch Inverter Board Removal
 |
View all Dell Inspiron 3200 manuals
Add to My Manuals
Save this manual to your list of manuals |
Page 96 highlights
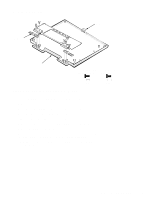
12.1-Inch LCD Inverter Board back cover inverter board connector CN2 snaps (2) . Figure 4-42. 12.1-Inch Inverter Board Removal inverter cable To remove the 12.1-inch inverter board, follow these steps: 1. Remove the front bezel. See "12.1-Inch LCD Front Bezel" found earlier in this section. 2. Remove the LCD panel. See the previous subsection, "12.1-Inch LCD Panel." You may not want to remove this panel if you are replacing only the inverter board. 3. Disconnect the inverter cable from connector CN2 at the bottom of the inverter board, and remove the cable. 4. Remove the inverter board from the back cover. The inverter board is mounted on two plastic snaps. It is held in place by these snaps and Kapton tape near the bottom of the board. When replacing the inverter board, make sure you have the correct board. The inverter board for a 12.1-inch IBM LCD assembly is different from the inverter board for a 12.1-inch Samsung LCD assembly. 4-60 Dell Inspiron 3000 Series Service Manual
-
 1
1 -
2
-
3
-
4
-
5
-
6
-
7
-
8
-
9
-
10
-
11
-
12
-
13
-
14
-
15
-
16
-
17
-
18
-
19
-
20
-
21
-
22
-
23
-
24
-
25
-
26
-
27
-
28
-
29
-
30
-
31
-
32
-
33
-
34
-
35
-
36
-
37
-
38
-
39
-
40
-
41
-
42
-
43
-
44
-
45
-
46
-
47
-
48
-
49
-
50
-
51
-
52
-
53
-
54
-
55
-
56
-
57
-
58
-
59
-
60
-
61
-
62
-
63
-
64
-
65
-
66
-
67
-
68
-
69
-
70
-
71
-
72
-
73
-
74
-
75
-
76
-
77
-
78
-
79
-
80
-
81
-
82
-
83
-
84
-
85
-
86
-
87
-
88
-
89
-
90
-
 91
91 -
 92
92 -
 93
93 -
 94
94 -
 95
95 -
 96
96 -
 97
97 -
 98
98 -
 99
99 -
 100
100 -
 101
101 -
102
-
103
-
104
-
105
-
106
-
107
-
108
-
109
-
110
-
111
-
112
 |
 |
