Dell Latitude 110L Quick Reference Guide - Page 17
Recalibrating a Battery Using the System Setup Utility, Removing a Battery, Battery Info - specifications
 |
View all Dell Latitude 110L manuals
Add to My Manuals
Save this manual to your list of manuals |
Page 17 highlights
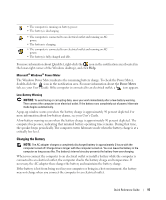
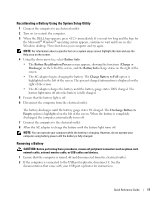
FILE LOCATION: J:\DL\DL044469\DTP\D8854eb0.fm Recalibrating a Battery Using the System Setup Utility 1 Connect the computer to an electrical outlet. 2 Turn on (or restart) the computer. 3 When the DELL logo appears, press immediately. If you wait too long and the logo for the Microsoft® Windows® operating system appears, continue to wait until you see the Windows desktop. Then shut down your computer and try again. NOTE: For information about a specific item on a system setup screen highlight the item and see the Help area on the screen. 4 Using the down-arrow key, select Battery Info. • The Battery Recalibration Process screen appears, showing the functions (Charge or Discharge) on the left of the screen, and the Battery Info charge status on the right of the screen. • The AC adapter begins charging the battery. The Charge Battery to Full option is highlighted on the left of the screen. The percent charged information is displayed on the right of the screen. • The AC adapter charges the battery until the battery gauge states 100% charged. The battery light turns off after the battery is fully charged. 5 Ensure that the battery light is off. 6 Disconnect the computer from the electrical outlet. The battery discharges until the battery gauge states 0% charged. The Discharge Battery to Empty option is highlighted on the left of the screen. When the battery is completely discharged, the computer automatically turns off. 7 Connect the computer to the electrical outlet. 8 Allow the AC adapter to charge the battery until the battery light turns off. NOTE: You can operate your computer while the battery is charging. However, do not operate your computer using battery power until the battery is fully charged. Removing a Battery CAUTION: Before performing these procedures, remove all peripheral connectors such as phone cord, network cable, external monitor cable, or USB cables and devices. 1 Ensure that the computer is turned off and disconnected from the electrical outlet. 2 If the computer is connected to the USB port replicator, disconnect it. See the documentation that came with your USB port replicator for instructions. DELL CONFIDENTIAL - PRELIMINARY 1/27/05 - FOR PROOF ONLY Quick Reference Guide 17
-
 1
1 -
2
-
3
-
4
-
5
-
6
-
7
-
8
-
9
-
10
-
11
-
 12
12 -
 13
13 -
 14
14 -
 15
15 -
 16
16 -
 17
17 -
 18
18 -
 19
19 -
 20
20 -
 21
21 -
 22
22 -
23
-
24
-
25
-
26
-
27
-
28
-
29
-
30
-
31
-
32
-
33
-
34
-
35
-
36
-
37
-
38
-
39
-
40
-
41
-
42
-
43
-
44
-
45
-
46
-
47
-
48
-
49
-
50
-
51
-
52
-
53
-
54
-
55
-
56
-
57
-
58
-
59
-
60
-
61
-
62
-
63
-
64
-
65
-
66
-
67
-
68
-
69
-
70
-
71
-
72
-
73
-
74
-
75
-
76
-
77
-
78
-
79
-
80
-
81
-
82
-
83
-
84
-
85
-
86
-
87
-
88
-
89
-
90
-
91
-
92
-
93
-
94
-
95
-
96
-
97
-
98
-
99
-
100
-
101
-
102
-
103
-
104
-
105
-
106
-
107
-
108
-
109
-
110
-
111
-
112
-
113
-
114
-
115
-
116
-
117
-
118
-
119
-
120
-
121
-
122
-
123
-
124
-
125
-
126
-
127
-
128
-
129
-
130
-
131
-
132
-
133
-
134
-
135
-
136
-
137
-
138
-
139
-
140
-
141
-
142
-
143
-
144
-
145
-
146
-
147
-
148
-
149
-
150
-
151
-
152
-
153
-
154
-
155
-
156
-
157
-
158
-
159
-
160
 |
 |
