Dell Latitude Z Service Manual - Page 7
Device Status Lights, Battery Status Lights, Battery Charge and Health Status, No-POST Light Codes - review
 |
View all Dell Latitude Z manuals
Add to My Manuals
Save this manual to your list of manuals |
Page 7 highlights
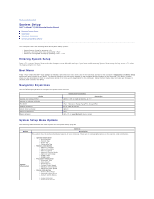
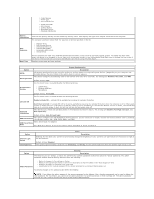
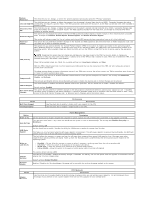
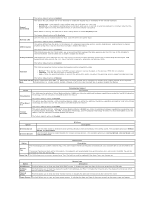
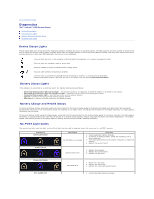
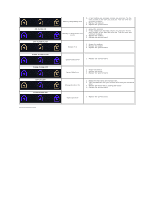
Back to Contents Page Diagnostics Dell™ Latitude™ Z600 Service Manual Device Status Lights Battery Status Lights Battery Charge and Health Status No-POST Light Codes Device Status Lights Device status LEDs are a strong source for diagnosing common problems that occur on portable systems. The LED locations vary from system to system so be sure to review the specific training pages (typically found under the Chassis section) to learn where the LEDs are located. One thing that remains common on portable platforms is what each LED represents and how errors are displayed. Turns on when you turn on the computer and blinks when the computer is in a power management mode. Turns on when the computer reads or writes data. Turns on steadily or blinks to indicate battery charge status. Turns on when wireless networking is enabled. Turns on when a card with Bluetooth® wireless technology is enabled. To turn off only the Bluetooth wireless technology function, right-click the icon in the system tray and select Disable Bluetooth Radio. Battery Status Lights If the computer is connected to an electrical outlet, the battery light operates as follows: l Alternately blinking amber light and blue light - An unauthenticated or unsupported, non-Dell AC adapter is attached to your laptop. l Alternately blinking amber light with steady blue light - Temporary battery failure with AC adapter present. l Constantly blinking amber light - Fatal battery failure with AC adapter present. l Light off - Battery in full charge mode with AC adapter present. l Blue light on - Battery in charge mode with AC adapter present. Battery Charge and Health Status To check the battery charge, press and release the status button on the battery charge gauge to illuminate the charge-level lights. Each light represents approximately 20 percent of the total battery charge. For example, if four lights are on, the battery has 80 percent of its charge remaining. If no lights appear, the battery has no charge. To check the battery health using the charge gauge, press and hold the status button on the battery charge gauge for at least 3 seconds. If no lights appear, the battery is in good condition and more than 80 percent of its original charge capacity remains. Each light represents incremental degradation. If five lights appear, less than 60 percent of the charge capacity remains, and you should consider replacing the battery. No-POST Light Codes The numeric key light, caps lock light, and scroll lock light are also used to diagnose issues that may occur in a no-POST scenario. Appearance ON-FLASH-FLASH Description No SODIMMs are installed Next Step 1. Install supported memory modules. 2. If memory is already present, reseat the module(s) one at time in each slot. 3. Try known good memory from another computer or replace the memory. 4. Replace the system board. FLASH-ON-ON System board error 1. Reseat the processor. 2. Replace the system board. 3. Replace the processor. FLASH-ON-FLASH LCD Panel Error 1. Reseat the LCD cable. 2. Replace the LCD panel. 3. Replace the video card/system board. OFF-FLASH-OFF 1. Install compatible memory modules.
-
 1
1 -
 2
2 -
 3
3 -
 4
4 -
 5
5 -
 6
6 -
 7
7 -
 8
8 -
 9
9 -
 10
10 -
 11
11 -
 12
12 -
13
-
14
-
15
-
16
-
17
-
18
-
19
-
20
-
21
-
22
-
23
-
24
-
25
-
26
-
27
-
28
-
29
-
30
-
31
-
32
-
33
-
34
-
35
-
36
-
37
 |
 |