Dell OptiPlex GX100 User Guide - Page 20
Installing a Diskette, Tape, or CD-ROM Drive in a Low-Profile Chassis
 |
View all Dell OptiPlex GX100 manuals
Add to My Manuals
Save this manual to your list of manuals |
Page 20 highlights
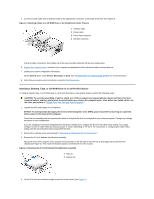
5. Connect a power cable and an interface cable to the appropriate connectors on the back of the drive (see Figure 3). Figure 3. Attaching Cables to a CD-ROM Drive in the Small-Form-Factor Chassis 1 Interface cable 2 Power cable 3 Power input connector 4 Interface connector Check all cable connections. Fold cables out of the way to provide airflow for the fan and cooling vents. 6. Replace the computer cover; reconnect your computer and peripherals to their electrical outlets, and turn them on. 7. Update your system configuration information. Set the Drive 0 option under Drives: Secondary to Auto. See "Primary Drive n and Secondary Drive n" for more information. 8. Verify that your system works correctly by running the Dell Diagnostics. Installing a Diskette, Tape, or CD-ROM Drive in a Low-Profile Chassis To install a diskette, tape, or CD-ROM drive in a 5.25-inch drive bay in a low-profile chassis, perform the following steps. CAUTION: To avoid the possibility of electric shock, turn off the computer and any peripherals, disconnect them from their electrical outlets, and then wait at least 5 seconds before you remove the computer cover. Also, before you install a drive, see the other precautions in "Safety First-For You and Your Computer." 1. Unpack the drive and prepare it for installation. NOTICE: To avoid possibly damaging the drive by electromagnetic static (EMS), ground yourself by touching an unpainted metal surface on the back of the computer. Check the documentation that accompanied the drive to verify that the drive is configured for your computer system. Change any settings necessary for your configuration. If you are installing an enhanced integrated drive electronics (EIDE) drive, configure the drive for the cable select setting. You usually configure a drive for cable select by setting a jumper or switch, depending on the drive. For instructions on configuring the cable select setting, see the documentation that accompanied the drive. 2. Remove the computer cover as instructed in "Removing and Replacing the Computer Cover." 3. Remove the 3.5-inch diskette drive/bracket assembly. Facing the front of the computer, press outward on the two tabs on the left side of the drive bay to disengage the bracket from the chassis (see Figure 4). Then rotate the bracket upward, and remove it from the chassis. Figure 4. Removing the 3.5-Inch Diskette Drive/Bracket Assembly 1 Tabs (2) 2 Notches (2) 4. Lift the 5.25-inch drive bracket straight up and out of the chassis (see Figure 5).
-
 1
1 -
2
-
3
-
4
-
5
-
6
-
7
-
8
-
9
-
10
-
11
-
12
-
13
-
14
-
 15
15 -
 16
16 -
 17
17 -
 18
18 -
 19
19 -
 20
20 -
 21
21 -
 22
22 -
 23
23 -
 24
24 -
 25
25 -
26
-
27
-
28
-
29
-
30
-
31
-
32
-
33
-
34
-
35
-
36
-
37
-
38
-
39
-
40
-
41
-
42
-
43
-
44
-
45
-
46
-
47
-
48
-
49
-
50
-
51
-
52
-
53
-
54
-
55
-
56
-
57
-
58
-
59
-
60
-
61
-
62
-
63
-
64
-
65
-
66
-
67
-
68
-
69
-
70
-
71
-
72
-
73
-
74
-
75
-
76
-
77
-
78
-
79
-
80
-
81
-
82
-
83
-
84
-
85
-
86
-
87
-
88
-
89
-
90
-
91
-
92
-
93
-
94
-
95
-
96
-
97
-
98
-
99
-
100
-
101
-
102
-
103
-
104
-
105
-
106
-
107
 |
 |
