Dell OptiPlex GX100 User Guide - Page 55
step 2, Back to Contents
 |
View all Dell OptiPlex GX100 manuals
Add to My Manuals
Save this manual to your list of manuals |
Page 55 highlights
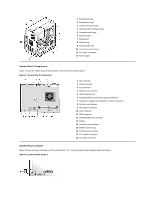
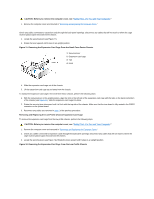
1. With the securing lever in the upright position, align the slots in the left side of the expansion-card cage with the tabs on the back and bottom of the chassis (see Figure 13). Slide the expansion-card cage into place. 2. Rotate the securing lever inward until it is flush with the top side of the chassis. Make sure that the riser board is fully seated in the RISER connector on the system board (see Figure 7). 3. Reconnect any cables you removed in step 2 of the previous procedure. Back to Contents Page
-
 1
1 -
2
-
3
-
4
-
5
-
6
-
7
-
8
-
9
-
10
-
11
-
12
-
13
-
14
-
15
-
16
-
17
-
18
-
19
-
20
-
21
-
22
-
23
-
24
-
25
-
26
-
27
-
28
-
29
-
30
-
31
-
32
-
33
-
34
-
35
-
36
-
37
-
38
-
39
-
40
-
41
-
42
-
43
-
44
-
45
-
46
-
47
-
48
-
49
-
 50
50 -
 51
51 -
 52
52 -
 53
53 -
 54
54 -
 55
55 -
 56
56 -
 57
57 -
 58
58 -
 59
59 -
 60
60 -
61
-
62
-
63
-
64
-
65
-
66
-
67
-
68
-
69
-
70
-
71
-
72
-
73
-
74
-
75
-
76
-
77
-
78
-
79
-
80
-
81
-
82
-
83
-
84
-
85
-
86
-
87
-
88
-
89
-
90
-
91
-
92
-
93
-
94
-
95
-
96
-
97
-
98
-
99
-
100
-
101
-
102
-
103
-
104
-
105
-
106
-
107
 |
 |

1.
With the securing lever in the upright position, align the slots in the left side of the expansion-card cage with the tabs on the back and bottom
of the chassis (see
Figure 13
). Slide the expansion-card cage into place.
2.
Rotate the securing lever inward until it is flush with the top side of the chassis. Make sure that the riser board is fully seated in the RISER
connector on the system board (see
Figure 7
).
3.
Reconnect any cables you removed in
step 2
of the previous procedure.
Back to Contents Page