Dell PowerEdge PDU Metered LCD User Manual - Page 16
Replacing the Side Panels, Reversing the Front Door (optional)
 |
View all Dell PowerEdge PDU Metered LCD manuals
Add to My Manuals
Save this manual to your list of manuals |
Page 16 highlights
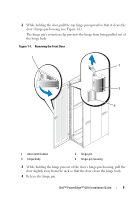
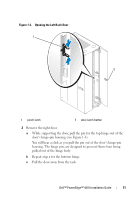
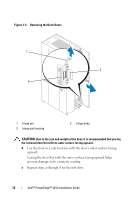
2 Allow the side panel to swing outward slightly from the bottom. 3 Grasp the panel firmly using the handles. 4 Lift the panel upward until it clears the top of the rack (see Figure 1-4). 5 Pull the side panel away from the rack. CAUTION: Because of the size and weight of the rack cabinet side panels, never attempt to remove or install them by yourself. 6 Place the panel in a safe location with the panel's outer surface facing upward. Placing the panel with the outer surface facing upward helps prevent damage to its cosmetic coating. 7 Repeat step 1 through step 6 for the other side panel. Replacing the Side Panels CAUTION: Because of the size and weight of the rack cabinet side panels, never attempt to remove or install them by yourself. To replace the side panels, perform the removal steps in reverse. Reversing the Front Door (optional) NOTE: Use a 4-mm Allen wrench to remove the front-door hinge bodies from the rack and reinstall them on the side opposite their original positions. You might need a stepladder in order to access the Allen bolt that secures the top hinge body to the rack. To reverse the direction that the front door opens, complete the following steps: 1 Remove the front door. For instructions, see "Removing the Front Door." 2 Remove the side panels. For instructions, see "Removing the Side Panels." 3 Reverse the top hinge body. a Pull the hinge pin upward slightly so that you can access the retention clip (see Figure 1-5). b Using the needle-nose pliers, remove the retention clip, and slide the hinge pin out of the hinge body. 14 Dell™ PowerEdge™ 4210 Installation Guide
-
 1
1 -
2
-
3
-
4
-
5
-
6
-
7
-
8
-
9
-
10
-
 11
11 -
 12
12 -
 13
13 -
 14
14 -
 15
15 -
 16
16 -
 17
17 -
 18
18 -
 19
19 -
 20
20 -
 21
21 -
22
-
23
-
24
-
25
-
26
-
27
-
28
-
29
-
30
-
31
-
32
-
33
-
34
-
35
-
36
-
37
-
38
-
39
-
40
-
41
-
42
-
43
-
44
-
45
-
46
-
47
-
48
-
49
-
50
-
51
-
52
-
53
-
54
-
55
-
56
-
57
-
58
-
59
-
60
-
61
-
62
-
63
-
64
-
65
-
66
-
67
-
68
-
69
-
70
-
71
-
72
-
73
-
74
-
75
-
76
-
77
-
78
-
79
-
80
-
81
-
82
-
83
-
84
-
85
-
86
-
87
-
88
-
89
-
90
-
91
-
92
-
93
-
94
-
95
-
96
-
97
-
98
-
99
-
100
-
101
-
102
-
103
-
104
-
105
-
106
-
107
-
108
-
109
-
110
-
111
-
112
-
113
-
114
-
115
-
116
-
117
-
118
-
119
-
120
-
121
-
122
-
123
-
124
-
125
-
126
-
127
-
128
-
129
-
130
-
131
-
132
-
133
-
134
-
135
-
136
-
137
-
138
-
139
-
140
-
141
-
142
-
143
-
144
-
145
-
146
-
147
-
148
-
149
-
150
-
151
-
152
-
153
-
154
-
155
-
156
-
157
-
158
-
159
-
160
-
161
-
162
 |
 |
