Dell PowerEdge SC1430 Hardware Owner's Manual - Page 83
Replacing the Cooling Fans, Replacing the Card and Front Fans
 |
View all Dell PowerEdge SC1430 manuals
Add to My Manuals
Save this manual to your list of manuals |
Page 83 highlights
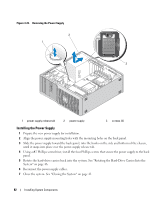
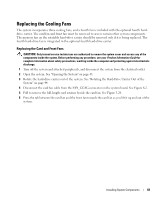
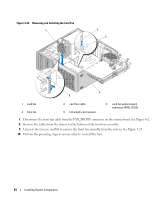
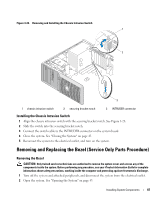
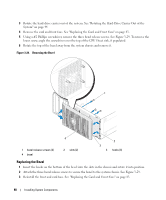
Replacing the Cooling Fans The system incorporates three cooling fans, and a fourth fan is included with the optional fourth harddrive carrier. The card fan and front fan must be removed to access certain other system components. The memory fan on the rotatable hard-drive carrier should be removed only if it is being replaced. The fourth hard-drive fan is integrated in the optional fourth hard-drive carrier. Replacing the Card and Front Fans CAUTION: Only trained service technicians are authorized to remove the system cover and access any of the components inside the system. Before performing any procedure, see your Product Information Guide for complete information about safety precautions, working inside the computer and protecting against electrostatic discharge. 1 Turn off the system and attached peripherals, and disconnect the system from the electrical outlet. 2 Open the system. See "Opening the System" on page 43. 3 Rotate the hard-drive carrier out of the system. See "Rotating the Hard-Drive Carrier Out of the System" on page 44. 4 Disconnect the card fan cable from the FAN_CCAG connector on the system board. See Figure 6-2. 5 Pull to remove the full-length card retainer beside the card fan. See Figure 3-26. 6 Press the tab between the card fan and the front fan towards the card fan as you lift it up and out of the system. Installing System Components 83
-
 1
1 -
2
-
3
-
4
-
5
-
6
-
7
-
8
-
9
-
10
-
11
-
12
-
13
-
14
-
15
-
16
-
17
-
18
-
19
-
20
-
21
-
22
-
23
-
24
-
25
-
26
-
27
-
28
-
29
-
30
-
31
-
32
-
33
-
34
-
35
-
36
-
37
-
38
-
39
-
40
-
41
-
42
-
43
-
44
-
45
-
46
-
47
-
48
-
49
-
50
-
51
-
52
-
53
-
54
-
55
-
56
-
57
-
58
-
59
-
60
-
61
-
62
-
63
-
64
-
65
-
66
-
67
-
68
-
69
-
70
-
71
-
72
-
73
-
74
-
75
-
76
-
77
-
 78
78 -
 79
79 -
 80
80 -
 81
81 -
 82
82 -
 83
83 -
 84
84 -
 85
85 -
 86
86 -
 87
87 -
 88
88 -
89
-
90
-
91
-
92
-
93
-
94
-
95
-
96
-
97
-
98
-
99
-
100
-
101
-
102
-
103
-
104
-
105
-
106
-
107
-
108
-
109
-
110
-
111
-
112
-
113
-
114
-
115
-
116
-
117
-
118
-
119
-
120
-
121
-
122
-
123
-
124
-
125
-
126
-
127
-
128
-
129
-
130
-
131
-
132
-
133
-
134
-
135
-
136
-
137
-
138
-
139
-
140
-
141
-
142
-
143
-
144
-
145
-
146
-
147
-
148
-
149
-
150
-
151
-
152
-
153
-
154
-
155
-
156
-
157
-
158
-
159
-
160
 |
 |