Dell Precision 400 Service Manual (.pdf) - Page 72
DIMMs, DIMM Removal, DIMM Installation
 |
View all Dell Precision 400 manuals
Add to My Manuals
Save this manual to your list of manuals |
Page 72 highlights
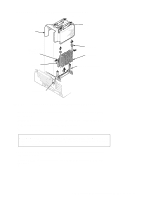
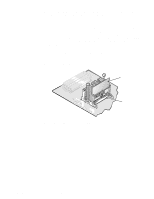
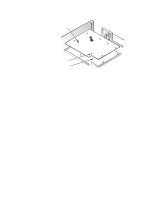
DIMMs DIMM Figure 4-20. DIMM Removal securing clips (2) To remove a DIMM, follow these steps: 1. Unlatch and rotate the power supply to the right (see Figure 4-14). 2. Push outward on the DIMM socket's securing clips until the DIMM is released from its socket. 3. Lift the DIMM away from the socket. DIMM securing clips (2) 2. 1. Figure 4-21. DIMM Installation To replace a DIMM, press the DIMM fully into the socket (see step 1 of Figure 4-21) while closing the securing clips to lock the DIMM into the socket (see step 2 of Figure 4-21). 4-20 Dell WorkStation 400 Systems Service Manual
-
 1
1 -
2
-
3
-
4
-
5
-
6
-
7
-
8
-
9
-
10
-
11
-
12
-
13
-
14
-
15
-
16
-
17
-
18
-
19
-
20
-
21
-
22
-
23
-
24
-
25
-
26
-
27
-
28
-
29
-
30
-
31
-
32
-
33
-
34
-
35
-
36
-
37
-
38
-
39
-
40
-
41
-
42
-
43
-
44
-
45
-
46
-
47
-
48
-
49
-
50
-
51
-
52
-
53
-
54
-
55
-
56
-
57
-
58
-
59
-
60
-
61
-
62
-
63
-
64
-
65
-
66
-
 67
67 -
 68
68 -
 69
69 -
 70
70 -
 71
71 -
 72
72 -
 73
73 -
 74
74 -
 75
75 -
 76
76 -
 77
77 -
78
-
79
-
80
-
81
-
82
-
83
-
84
-
85
-
86
-
87
-
88
-
89
-
90
-
91
-
92
-
93
-
94
-
95
-
96
-
97
-
98
-
99
-
100
-
101
-
102
-
103
-
104
-
105
-
106
-
107
-
108
-
109
-
110
-
111
-
112
-
113
-
114
-
115
-
116
-
117
-
118
 |
 |

4-20
Dell WorkStation 400 Systems Service Manual
DIMMs
Figure 4-20.
DIMM Removal
To remove a DIMM, follow these steps:
1.
Unlatch and rotate the power supply to the right (see Figure 4-14).
2.
Push outward on the DIMM socket’s securing clips until the DIMM is
released from its socket.
3.
Lift the DIMM away from the socket.
Figure 4-21.
DIMM Installation
To replace a DIMM, press the DIMM fully into the socket (see step 1 of
Figure 4-21) while closing the securing clips to lock the DIMM into the socket
(see step 2 of Figure 4-21).
securing clips (2)
DIMM
securing clips (2)
1.
2.
DIMM