Dell Precision 400 Service Manual (.pdf) - Page 73
Processor SEC Cartridge/Heat Sink Assembly, Shroud and SEC Cartridge/Heat Sink Removal
 |
View all Dell Precision 400 manuals
Add to My Manuals
Save this manual to your list of manuals |
Page 73 highlights
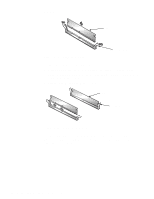
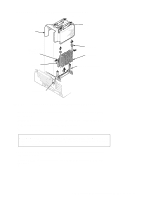
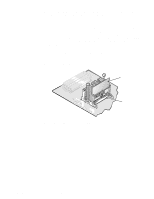
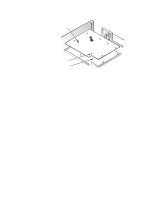
Processor SEC Cartridge/Heat Sink Assembly shroud tabs (2) SEC cartridge release latches (2) SEC cartridge thumbscrews (2) heat sink guide bracket assembly alignment slot Figure 4-22. Shroud and SEC Cartridge/Heat Sink Removal To remove a processor single-edge contact (SEC) cartridge/heat sink assembly, follow these steps: 1. Rotate the power supply away from the processor airflow shroud. 2. Remove the airflow shroud from the processor(s). Squeeze both pairs of tabs on top of the shroud and lift it out of the chassis. WARNING: The processor SEC cartridge/heat sink assembly can get extremely hot. Be sure the assembly has had sufficient time to cool before you touch it. 3. Unscrew and remove the two thumbscrews that secure the heat sink to the system board. 4. Press the SEC cartridge release latches inward until they snap into position. Removing and Replacing Parts in the Midsize Chassis 4-21
-
 1
1 -
2
-
3
-
4
-
5
-
6
-
7
-
8
-
9
-
10
-
11
-
12
-
13
-
14
-
15
-
16
-
17
-
18
-
19
-
20
-
21
-
22
-
23
-
24
-
25
-
26
-
27
-
28
-
29
-
30
-
31
-
32
-
33
-
34
-
35
-
36
-
37
-
38
-
39
-
40
-
41
-
42
-
43
-
44
-
45
-
46
-
47
-
48
-
49
-
50
-
51
-
52
-
53
-
54
-
55
-
56
-
57
-
58
-
59
-
60
-
61
-
62
-
63
-
64
-
65
-
66
-
67
-
 68
68 -
 69
69 -
 70
70 -
 71
71 -
 72
72 -
 73
73 -
 74
74 -
 75
75 -
 76
76 -
 77
77 -
 78
78 -
79
-
80
-
81
-
82
-
83
-
84
-
85
-
86
-
87
-
88
-
89
-
90
-
91
-
92
-
93
-
94
-
95
-
96
-
97
-
98
-
99
-
100
-
101
-
102
-
103
-
104
-
105
-
106
-
107
-
108
-
109
-
110
-
111
-
112
-
113
-
114
-
115
-
116
-
117
-
118
 |
 |
