Dell XPS 13 9310 2-in-1 XPS 13 2-in-1 9310 2n1 Service Manual - Page 33
Tighten the captive screw that secures the right keyboard bracket to the palm-rest assembly.
 |
View all Dell XPS 13 9310 2-in-1 manuals
Add to My Manuals
Save this manual to your list of manuals |
Page 33 highlights
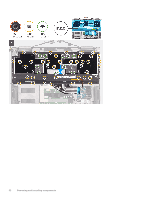
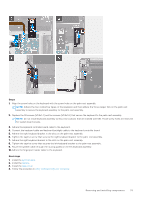
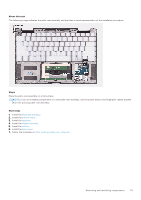
Steps 1. Align the screw holes on the keyboard with the screw holes on the palm-rest assembly. NOTE: Adhere the two conductive tapes on the keyboard, and then adhere the three copper foils on the palm-rest assembly to secure the keyboard assembly to the palm-rest assembly. 2. Replace the 38 screws (M1.2x1.4) and ten screws (M1.2x1.6) that secure the keyboard to the palm-rest assembly. NOTE: Do not install keyboard assembly screws into locations that are marked with MB. Those screw holes are reserved for system board screws. 3. Adhere the keyboard controller board cable to the keyboard. 4. Connect the keyboard cable and keyboard backlight cable to the keyboard controller board. 5. Adhere the right keyboard bracket in the slots on the palm-rest assembly. 6. Tighten the captive screw that secures the right keyboard bracket to the palm-rest assembly. 7. Adhere the right keyboard bracket in the slots on the palm-rest assembly. 8. Tighten the captive screw that secures the left keyboard bracket to the palm-rest assembly. 9. Route the speaker cable through the routing guides on the left keyboard assembly. 10. Adhere the fingerprint reader cable to the keyboard. Next steps 1. Install the system board. 2. Install the battery. 3. Install the base cover. 4. Follow the procedure in After working inside your computer. Removing and installing components 33
-
 1
1 -
2
-
3
-
4
-
5
-
6
-
7
-
8
-
9
-
10
-
11
-
12
-
13
-
14
-
15
-
16
-
17
-
18
-
19
-
20
-
21
-
22
-
23
-
24
-
25
-
26
-
27
-
 28
28 -
 29
29 -
 30
30 -
 31
31 -
 32
32 -
 33
33 -
 34
34 -
 35
35 -
 36
36 -
 37
37 -
 38
38 -
39
-
40
-
41
-
42
-
43
-
44
-
45
-
46
-
47
-
48
-
49
-
50
-
51
-
52
 |
 |
