Dell XPS 13 9315 2-in-1 Service Manual - Page 14
System setup, Entering BIOS setup program without keyboard, Entering BIOS setup program with XPS
 |
View all Dell XPS 13 9315 2-in-1 manuals
Add to My Manuals
Save this manual to your list of manuals |
Page 14 highlights
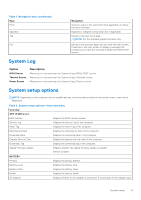
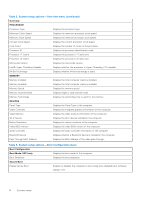
4 System setup CAUTION: Unless you are an expert computer user, do not change the settings in the BIOS Setup program. Certain changes can make your computer work incorrectly. NOTE: Depending on the computer and its installed devices, the items listed in this section may or may not be displayed. NOTE: Before you change BIOS Setup program, it is recommended that you write down the BIOS Setup program screen information for future reference. Use the BIOS Setup program for the following purposes: ● Get information about the hardware installed in your computer, such as the amount of RAM and the size of the hard drive. ● Change the system configuration information. ● Set or change a user-selectable option, such as the user password, type of hard drive installed, and enabling or disabling base devices. Entering BIOS setup program without keyboard Steps 1. Press the power button to turn on your computer. 2. Press and hold the volume-down button when the Dell logo appears on the screen. 3. Select the BIOS Setup menu. Entering BIOS setup program with XPS Folio keyboard Prerequisites Connect an XPS Folio keyboard to the computer. NOTE: The XPS Folio keyboard is sold as an upsell. Steps Press the power button to turn on your computer and press F2 immediately. Navigation keys NOTE: Connect to an XPS Folio keyboard to the computer to use these navigation keys. NOTE: For most of the System Setup options, changes that you make are recorded but do not take effect until you restart the computer. Table 1. Navigation keys Keys Up arrow Down arrow Navigation Moves to the previous field. Moves to the next field. 14 System setup
-
 1
1 -
2
-
3
-
4
-
5
-
6
-
7
-
8
-
 9
9 -
 10
10 -
 11
11 -
 12
12 -
 13
13 -
 14
14 -
 15
15 -
 16
16 -
 17
17 -
 18
18 -
 19
19 -
20
-
21
-
22
-
23
-
24
-
25
-
26
-
27
-
28
-
29
-
30
-
31
-
32
-
33
-
34
-
35
 |
 |