Dell XPS M140 MXC051 XPS M140 Service Manual - Page 20
Memory Module and Modem: Dell™ XPS M140 Service Manual, Removing a Memory Module
 |
View all Dell XPS M140 MXC051 manuals
Add to My Manuals
Save this manual to your list of manuals |
Page 20 highlights
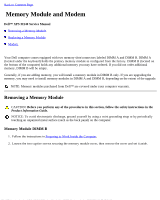
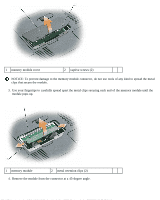
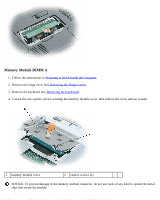
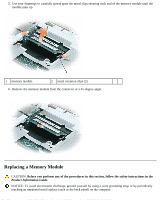
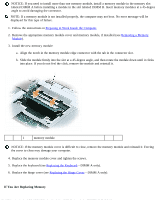
Back to Contents Page Memory Module and Modem Dell™ XPS M140 Service Manual Removing a Memory Module Replacing a Memory Module Modem Your Dell computer comes equipped with two memory slots/connectors labeled DIMM A and DIMM B. DIMM A (located under the keyboard) holds the primary memory module as configured from the factory. DIMM B (located on the bottom of the computer) holds any additional memory you may have ordered. If you did not order additional memory, DIMM B will be empty. Generally, if you are adding memory, you will install a memory module in DIMM B only. If you are upgrading the memory, you may need to install memory modules in DIMM A and DIMM B, depending on the extent of the upgrade. NOTE: Memory modules purchased from Dell™ are covered under your computer warranty. Removing a Memory Module CAUTION: Before you perform any of the procedures in this section, follow the safety instructions in the Product Information Guide. NOTICE: To avoid electrostatic discharge, ground yourself by using a wrist grounding strap or by periodically touching an unpainted metal surface (such as the back panel) on the computer. Memory Module DIMM B 1. Follow the instructions in Preparing to Work Inside the Computer. 2. Loosen the two captive screws securing the memory module cover, then remove the cover and set it aside.
-
 1
1 -
2
-
3
-
4
-
5
-
6
-
7
-
8
-
9
-
10
-
11
-
12
-
13
-
14
-
 15
15 -
 16
16 -
 17
17 -
 18
18 -
 19
19 -
 20
20 -
 21
21 -
 22
22 -
 23
23 -
 24
24 -
 25
25 -
26
-
27
-
28
-
29
-
30
-
31
-
32
-
33
-
34
-
35
-
36
-
37
-
38
-
39
-
40
-
41
-
42
-
43
-
44
-
45
-
46
-
47
-
48
-
49
-
50
-
51
-
52
-
53
-
54
-
55
-
56
-
57
-
58
-
59
-
60
-
61
-
62
-
63
-
64
-
65
-
66
-
67
-
68
-
69
-
70
-
71
-
72
 |
 |
