Dell XPS M140 MXC051 XPS M140 Service Manual - Page 33
Replacing the Keyboard
 |
View all Dell XPS M140 MXC051 manuals
Add to My Manuals
Save this manual to your list of manuals |
Page 33 highlights
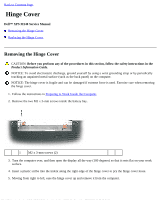
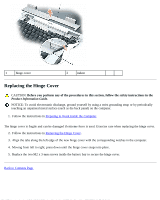
1 keyboard 3 keyboard connector tabs 2 keyboard cable 4 system board connector 5 system board connector slots 6 keyboard tabs (6) Replacing the Keyboard CAUTION: Before you perform any of the procedures in this section, follow the safety instructions in the Product Information Guide. NOTICE: To avoid electrostatic discharge, ground yourself by using a wrist grounding strap or by periodically touching an unpainted metal surface (such as the back panel) on the computer. 1. Follow the instructions in Preparing to Work Inside the Computer. 2. Follow the instructions in Removing the Keyboard. NOTICE: Before securing the latch on the system board connector, ensure that the keyboard connector is seated and the tabs on the connector are properly aligned with the slots on the system board connector. Failure to align the tabs could result in a malfunction of the computer or damage to the cable and/or the cable connector. 3. Align the tabs on the keyboard connector of the new keybord with the corresponding slots on the system board connector, then press the latch on the system board connector down to lock the keyboard cable into place. 4. Slide the six tabs along the front edge of the keyboard beneath the palm rest. NOTE: You may need to push the bottom of the keyboard down slightly to slide the keyboard tabs into place. 5. Gently press down on the left and right sides of the keyboard near the keyboard retention tabs until the keyboard snaps into place. 6. Replace the hinge cover (see Replacing the Hinge Cover). Back to Contents Page
-
 1
1 -
2
-
3
-
4
-
5
-
6
-
7
-
8
-
9
-
10
-
11
-
12
-
13
-
14
-
15
-
16
-
17
-
18
-
19
-
20
-
21
-
22
-
23
-
24
-
25
-
26
-
27
-
 28
28 -
 29
29 -
 30
30 -
 31
31 -
 32
32 -
 33
33 -
 34
34 -
 35
35 -
 36
36 -
 37
37 -
 38
38 -
39
-
40
-
41
-
42
-
43
-
44
-
45
-
46
-
47
-
48
-
49
-
50
-
51
-
52
-
53
-
54
-
55
-
56
-
57
-
58
-
59
-
60
-
61
-
62
-
63
-
64
-
65
-
66
-
67
-
68
-
69
-
70
-
71
-
72
 |
 |
