Denon AVR 1603 Owners Manual - Page 10
Before setting up the system, Setting the speaker configuration - remote control
 |
View all Denon AVR 1603 manuals
Add to My Manuals
Save this manual to your list of manuals |
Page 10 highlights
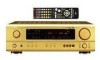
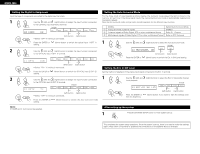
ENGLISH Before setting up the system 1 Check that all the components are correct, then press the POWER operation switch on the main unit to turn on the power. (Main unit) 2 3 Press the SYSTEM SETUP button to enter the setting. *SYSTEM SET UP NOTE: Please make sure the "AUDIO" position of the slide switch on the remote control unit. Press the ENTER or configuration set up. (down) button to switch to the speaker NOTE: Press the SYSTEM SETUP button again to finish system set up. System set up can be finished at any time. The changes to the settings made up to that point are entered. 4 Use the (left) and (right) buttons to select your subwoofer setting. (Initial) 4 S.WOOFER YES YES NO (left) button (right) button Press the ENTER or (down) button to enter the settings and switch to the SUBWOOFER MODE setting. • Parameters Large...... Select this when using speakers that can fully reproduce low sounds of below 80 Hz. Small...... Select this when using speakers that cannot reproduce low sounds of below 80 Hz with sufficient volume. When this setting is selected, low frequencies of below 80 Hz are assigned to the subwoofer. None...... Select this when no speakers are installed. Yes/No.... Select "Yes" when a subwoofer is installed, "No" when it's not installed. NOTE: Select "Large" or "Small" not according to the physical size of the speaker, but according to the bass reproduction capacity at 80 Hz. If you cannot determine the best setting, try comparing the sound when set to "Small" and when set to "Large", at a level that will not damage the speakers. Caution: In case the subwoofer is not used, be sure to set "Subwoofer = No", or the bass sound of front channel is divided to subwoofer channel and not reproduced in some mode. Setting the speaker configuration 1 Use the (left) and (right) buttons to select your front speaker type. (Initial) 1 FRONT LARGE LARGE SMALL Press the ENTER or (left) button (right) button (down) button to switch to the center speaker setting. 2 Use the (left) and (right) buttons to select your center speaker type. (Initial) 2 CENTER SMALL LARGE SMALL NONE Press the ENTER or (left) button (right) button (down) button to switch to the surround speaker setting. NOTE: • When "Small" has been selected for the front speakers, "Large" cannot be selected for the center speaker. 3 Use the (left) and (right) buttons to select your surround speaker type. (Initial) 3 SURR. SMALL LARGE SMALL NONE (left) button (right) button Press the ENTER or (down) button to switch to the subwoofer setting. NOTE: • When "Small" has been selected for the front speakers, "Large" cannot be selected for the surround speakers. 10 Setting the Subwoofer mode and Crossover Frequency 1 Use the (left) and (right) buttons to select the Subwoofer mode. (Initial) 5 SW MODE NORM +MAIN NORM (left) button (right) button Press the ENTER or (down) button to enter the setting and switch to the Crossover Frequency setting. 2 Use the (left) and (right) buttons to select the Crossover Frequency. (Initial) 6 CR.OVER 80Hz 80Hz 100Hz 120Hz (left) button (right) button Press the ENTER or (down) button to enter the setting and switch to the SPEAKER DISTANCE setting.
-
 1
1 -
2
-
3
-
4
-
 5
5 -
 6
6 -
 7
7 -
 8
8 -
 9
9 -
 10
10 -
 11
11 -
 12
12 -
 13
13 -
 14
14 -
 15
15 -
16
-
17
-
18
-
19
-
20
-
21
-
22
-
23
-
24
-
25
-
26
-
27
-
28
-
29
-
30
-
31
-
32
-
33
-
34
-
35
-
36
-
37
-
38
-
39
-
40
-
41
-
42
-
43
-
44
-
45
-
46
-
47
-
48
-
49
-
50
-
51
-
52
-
53
-
54
-
55
-
56
-
57
-
58
 |
 |
