Denon AVR 1603 Owners Manual - Page 17
Playback using the external input EXT. IN jacks, Turning the sound off temporarily muting
 |
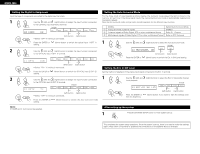
View all Denon AVR 1603 manuals
Add to My Manuals
Save this manual to your list of manuals |
Page 17 highlights
ENGLISH [5] Checking the currently playing program source, etc. 2 With the name of the volume to be adjusted selected, turn the SELECT knob to adjust the level. • To increase the bass or treble: 3 If you do not want the bass and treble to be adjusted, turn on the tone defeat mode. The signals do not pass through the 1 Front panel display • Descriptions of the unit's operations Turn the control clockwise. bass and treble adjustment circuits, are also displayed on the front panel 1 (The bass or treble sound can (Main unit) providing higher quality sound. display. In addition, the display can be increased to up to +12 dB in steps of 2 dB.) be switched to check the unit's 2 • To decrease the bass or treble: Turn the (Main unit) operating status while playing a (Remote control counterclockwise. (The bass or source by pressing the STATUS control unit) treble sound can be decreased to up to -12 button. dB in steps of 2 dB.) [2] Listening over headphones 1 Plug the headphones' plug into the jack. Connect the headphones to the PHONES jack. The pre-out output (including the speaker output) is automatically turned off when headphones are connected. PHONES NOTE: To prevent hearing loss, do not raise the volume level excessively when using headphones. 1 2 Using the dimmer function • Use this to change the brightness of the display. The display brightness changes in four steps (bright, medium, dim and off) by pressing the main unit's (Remote DIMMER button repeatedly. control unit) BRIGHT MEDIUM DIM OFF [3] Turning the sound off temporarily (muting) 1 Use this to turn off the audio output temporarily. Press the MUTING button. Cancelling MUTING mode. Press the MUTING button again. (Remote control unit) 1 Muting will also be cancelled when MASTER VOL is adjusted up or down. [4] Combining the currently playing sound with the desired image 1 Simulcast playback Use this switch to monitor a video source other than the audio source. Press the VIDEO SELECT button repeatedly until the desired source (Remote appears on the display. control unit) 1 Cancelling simulcast playback. • Select "SOURCE" using the VIDEO SELECT button. • Switch the program source to the component connected to the video input jacks. Playback using the external input (EXT. IN) jacks 1 Set the external input (EXT. IN) mode. Press the EXT. IN button to switch the external input. Once this is selected, the input signals (Main unit) (Remote control unit) connected to the FL (front left), FR (front right), C (center), SL (surround left) and SR (surround right) channels of the EXT. IN jacks are output directly to the front (left and right), center, surround (left and right) speaker systems without passing through the surround circuitry. In addition, the signal input to the SW (subwoofer) jack is output to the PRE OUT SUBWOOFER jack. 2 Cancelling the external input mode To cancel the external input (EXT. IN) setting, press the INPUT MODE (AUTO, PCM, DTS) or ANALOG button to switch to the desired input mode. (See page 16.) (Main unit) (Remote control unit) • When the input mode is set to the external input (EXT. IN), the play mode (DIRECT,STEREO, DOLBY/DTS SURROUND, 5CH STEREO or DSP SIMULATION) cannot be selected. 21 2 1 NOTES: • In play modes other than the external input mode, the signals connected to EXT. IN jacks cannot be played. In addition, signals cannot be output from channels not connected to the input jacks. • The external input mode can be set for any input source. To watch video while listening to sound, select the input source to which the video signal is connected, then set this mode. 17
-
 1
1 -
2
-
3
-
4
-
5
-
6
-
7
-
8
-
9
-
10
-
11
-
 12
12 -
 13
13 -
 14
14 -
 15
15 -
 16
16 -
 17
17 -
 18
18 -
 19
19 -
 20
20 -
 21
21 -
 22
22 -
23
-
24
-
25
-
26
-
27
-
28
-
29
-
30
-
31
-
32
-
33
-
34
-
35
-
36
-
37
-
38
-
39
-
40
-
41
-
42
-
43
-
44
-
45
-
46
-
47
-
48
-
49
-
50
-
51
-
52
-
53
-
54
-
55
-
56
-
57
-
58
 |
 |
