Denon AVR 1603 Owners Manual - Page 3
English, 1. Before Using, 2. Cautions On Installation, 3. Cautions On Handling, 4. Features - 5 1 channels receiver
 |
View all Denon AVR 1603 manuals
Add to My Manuals
Save this manual to your list of manuals |
Page 3 highlights
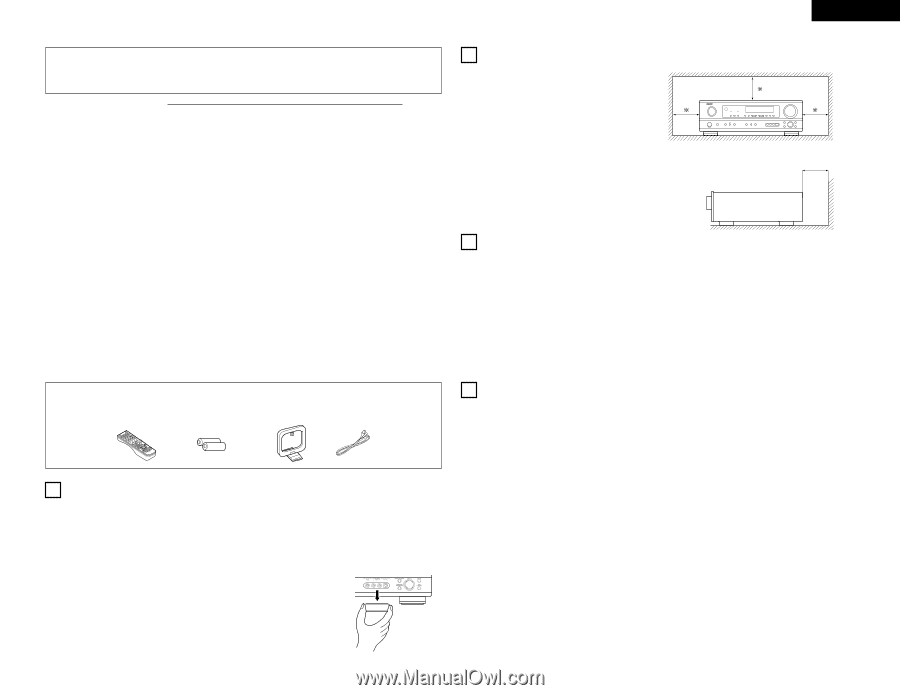
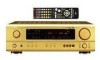
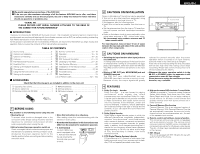
ENGLISH 2 We greatly appreciate your purchase of the AVR-1603. 2 To be sure you take maximum advantage of all the features AVR-1603 has to offer, read these instructions carefully and use the set properly. Be sure to keep this manual for future reference should any questions or problems arise. "SERIAL NO. PLEASE RECORD UNIT SERIAL NUMBER ATTACHED TO THE REAR OF THE CABINET FOR FUTURE REFERENCE" 2 INTRODUCTION Thank you for choosing the DENON A/V Surround receiver. This remarkable component has been engineered to provide superb surround sound listening with home theater sources such as DVD, as well as providing outstanding high fidelity reproduction of your favorite music sources. As this product is provided with an immense array of features, we recommend that before you begin hookup and operation that you review the contents of this manual before proceeding. TABLE OF CONTENTS z Before Using 3 x Cautions on Installation 3 c Cautions on Handling 3 v Features 3 b Part Names and Functions 4 n Read this First 5 m Setting up the Speaker Systems 5 , Connections 5 ~ 8 . Using the Remote Control Unit 9 ⁄0 Setting up the system 9 ~ 12 ⁄1 Remote Control Unit 13 ~ 15 ⁄2 Operation 15 ~ 18 ⁄3 Surround 18 ~ 20 ⁄4 DSP Surround Simulation 21 ~ 23 ⁄5 Listening to the Radio 23 ~ 26 ⁄6 Last Function Memory 26 ⁄7 Initialization of the Microprocessor 26 ⁄8 Additional Information 27, 28 ⁄9 Troubleshooting 28 ¤0 Specifications 29 List of Preset Codes 192 ~ 194 2 ACCESSORIES Check that the following parts are included in addition to the main unit: q Operating instructions 1 w Service station list 1 e Remote control unit (RC-920 1 r R6P/AA batteries 2 t AM loop antenna 1 y FM indoor antenna 1 e r t y 1 BEFORE USING Pay attention to the following before using this unit: • Moving the set • Store this instructions in a safe place. To prevent short circuits or damaged wires in the After reading, store this instructions along with the connection cords, always unplug the power cord and warranty in a safe place. disconnect the connection cords between all other • Note that the illustrations in this instructions may audio components when moving the set. differ from the actual set for explanation purposes. • Before turning the power operation switch on Check once again that all connections are proper and that there are not problems with the connection cords. Always set the power operation switch to the standby position before connecting and disconnecting connection cords. • V. AUX terminal The AVR-1603's front panel is equipped with a V. AUX terminal. Remove the cap covering the terminal when you want to use it. 2 CAUTIONS ON INSTALLATION Noise or disturbance of the picture may be generated if this unit or any other electronic equipment using microprocessors is used near a tuner or TV. If this happens, take the following steps: • Install this unit as far as possible from the tuner or TV. • Set the antenna wires from the tuner or TV away from this unit's power cord and input/output connection cords. • Noise or disturbance tends to occur particularly when using indoor antennas or 300 Ω/ohms feeder wires. We recommend using outdoor antennas and 75 Ω/ohms coaxial cables. For heat dispersal, leave at least 10 cm of space between the top, back and sides of this unit and the wall or other components. 10 cm or more 10 cm or more wall 3 CAUTIONS ON HANDLING • Switching the input function when input jacks are not connected A clicking noise may be produced if the input function is switched when nothing is connected to the input jacks. If this happens, either turn down the MASTER VOLUME control or connect components to the input jacks. • Muting of PRE OUT jack, HEADPHONE jack and SPEAKER terminals The PRE OUT jack, HEADPHONE jack and SPEAKER terminals include a muting circuit. Because of this, the output signals are greatly reduced for several seconds after the power operation switch is turned on or input function, surround mode or any other set-up is changed. If the volume is turned up during this time, the output will be very high after the muting circuit stops functioning. Always wait until the muting circuit turns off before adjusting the volume. • Whenever the power operation switch is in the £ OFF or STANDBY state, the apparatus is still connected on some AC line voltages. Please be sure to unplug the cord when you leave home for, say, a vacation. 4 FEATURES 1. Dolby Pro Logic II decoder Dolby Pro Logic II is a new format for playing multichannel audio signals that offers improvements over conventional Dolby Pro Logic. It can be used to decode not only sources recorded in Dolby Surround but also regular stereo sources into five channels (front left/right, center and surround left/right). In addition, various parameters can be set according to the type of source and the contents, so you can adjust the sound field with greater precision. 2. Dolby Digital decoder Dolby Digital, a digital discrete system in which the different channels are completely independent, recreates "three-dimensional" sound fields (sounds with a sense of distance, movement and position) with no crosstalk between channels for greater reality. In addition, the 5 channels (excluding the 0.1 channel for low frequency effects) have a playback range extending to 20 kHz, the same as the range of CDs, thus resulting in clearer, more richly expressive sound. 3. DTS (Digital Theater Systems) decoder DTS provides up to 5.1 channels of wide-range, high fidelity surround sound, from sources such as laser disc, DVD and specially-encoded music discs. 4. High performance DSP simulates 7 sound fields Playback is possible in 7 surround modes: 5-channel Stereo, Mono Movie, Rock Arena, Jazz Club, Video Game, Matrix and Virtual. You can enjoy a variety of sound effects for different movie scenes and program sources even with stereo sources not in Dolby Surround. 5. Personal Memory Plus function Personal Memory Plus is an advanced version of Personal Memory. With Personal Memory Plus, the set automatically memorizes the surround mode, channel volume, surround parameters, etc., for each of the separate input sources. 6. Remote control unit with pre-memory function This unit comes with a remote control unit equipped with a pre-memory function. The remote control command codes for DENON remote controllable AV components as well as for LD players, video decks, TVs, etc., of other major manufacturers are prestored in the memory. 7. EXT. IN jack This unit is equipped with EXT. IN jacks for use with audio formats of the future. 3
-
 1
1 -
 2
2 -
 3
3 -
 4
4 -
 5
5 -
 6
6 -
 7
7 -
 8
8 -
 9
9 -
10
-
11
-
12
-
13
-
14
-
15
-
16
-
17
-
18
-
19
-
20
-
21
-
22
-
23
-
24
-
25
-
26
-
27
-
28
-
29
-
30
-
31
-
32
-
33
-
34
-
35
-
36
-
37
-
38
-
39
-
40
-
41
-
42
-
43
-
44
-
45
-
46
-
47
-
48
-
49
-
50
-
51
-
52
-
53
-
54
-
55
-
56
-
57
-
58
 |
 |