Denon AVR-2106 Owners Manual - Page 45
Setting the Digital In Assign., Setting the Ext In SW Level, Setting the Input Function Level - specifications
 |
View all Denon AVR-2106 manuals
Add to My Manuals
Save this manual to your list of manuals |
Page 45 highlights
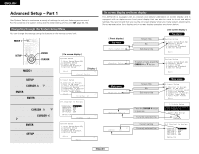
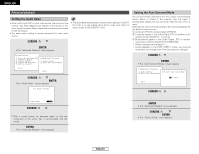
ENGLISH Advanced Setup - Part 1 Input Setup Setting the Digital In Assign. This setting assigns the digital input terminals of the AVR-2106 for the different input sources. 1 Press the CURSOR D or H button to select "Input Setup" at the "System Setup" menu, then press the ENTER button. • The "Input Setup" menu appears. • The OPTICAL 3 terminal on the AVR-2106's rear panel is equipped with an optical digital output terminal for recording digital signals on a CD recorder, MD recorder or other digital recorder. Use this for digital recording between a digital audio source (stereo - 2 channels) and a digital audio recorder. • Do not connect the output of the component connected to the OPTICAL 3 OUT terminal on the AVR-2106's rear panel to any terminal other than the OPTICAL 3 IN terminal. • "PHONO", "TUNER" and "V. AUX" cannot be selected with "Setting the Digital In Assign.". Advanced Setup - Part 1 Setting the Input Function Level • Correct the playback level of the different input sources. • Adjust the playback levels of the devices connected to the different input sources to the same level to eliminate the need for adjusting the main volume each time the input source is switched. 1 Press the CURSOR D or H button to select "Input Function Level" at the "Input Setup" menu, then press the ENTER button. • The "Input Function Level" screen appears. Setting the Ext In SW Level Set the method of playback of the analog input signal connected to the Ext. In Subwoofer. 2 Press the CURSOR D or H button to select "Digital In Assign.", then press the ENTER button. • The "Digital In Assign." screen appears. 1 Press the CURSOR D or H button to select "Ext In SW Level" at the "Input Setup" menu, then press the ENTER button. • The "Ext In SW Level" screen appears. 2 Press the CURSOR D or H button to select the input source, then press the CURSOR F or G button to adjust the level. The level can be adjusted between -12 dB and +12 dB in units of 1 dB. If "Yes" is selected for "Default", the settings are automatically reset to the default values. 3 Press the CURSOR D or H button to select the digital input terminal, then press the CURSOR F or G button to select the input source. Select "OFF" for input sources for which no digital input terminals are used. If "Yes" is selected for "Default", the settings are automatically reset to the default values. 4 Press the ENTER button to enter the setting. • The "Input Setup" menu appears. 2 Press the CURSOR F or G button to select according to the specifications of the player being used. Also refer to the player's operating instructions. +15dB (default) recommended (0, +5, +10 or +15 can be selected). 3 Press the ENTER button to enter the setting. • The "Input Setup" menu appears. 3 Press the ENTER button to enter the setting. • The "Input Setup" menu appears. • After completing this setting, check that the playback levels for the different sources are the same. 42 ENGLISH
-
 1
1 -
2
-
3
-
4
-
5
-
6
-
7
-
8
-
9
-
10
-
11
-
12
-
13
-
14
-
15
-
16
-
17
-
18
-
19
-
20
-
21
-
22
-
23
-
24
-
25
-
26
-
27
-
28
-
29
-
30
-
31
-
32
-
33
-
34
-
35
-
36
-
37
-
38
-
39
-
 40
40 -
 41
41 -
 42
42 -
 43
43 -
 44
44 -
 45
45 -
 46
46 -
 47
47 -
 48
48 -
 49
49 -
 50
50 -
51
-
52
-
53
-
54
-
55
-
56
-
57
-
58
-
59
-
60
-
61
-
62
-
63
-
64
-
65
-
66
-
67
-
68
-
69
-
70
-
71
-
72
 |
 |
