Denon AVR-2106 Owners Manual - Page 7
Easy Setup and Operation - remote
 |
View all Denon AVR-2106 manuals
Add to My Manuals
Save this manual to your list of manuals |
Page 7 highlights
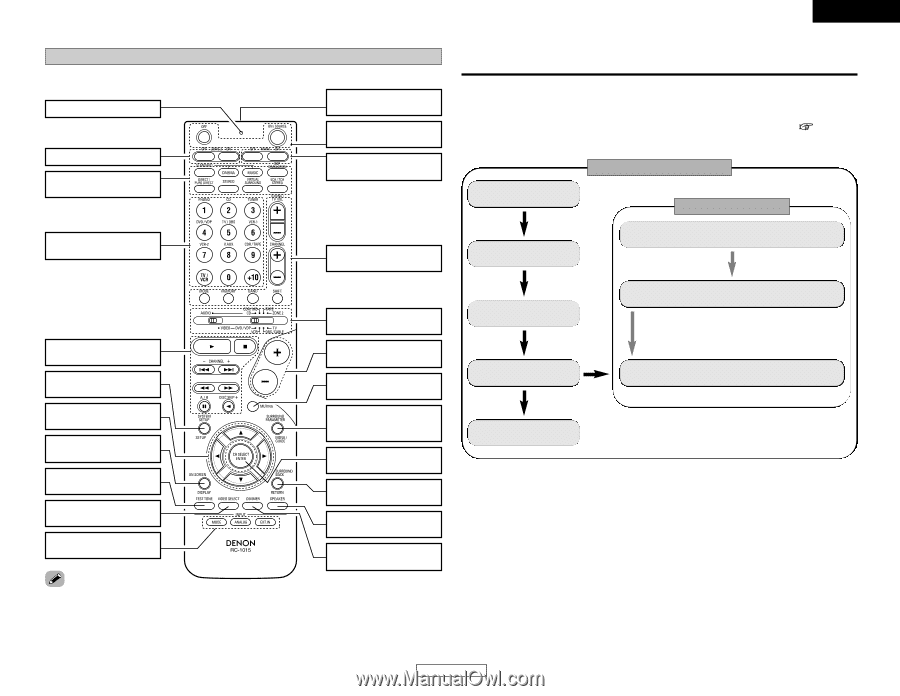
Getting Started Remote control unit For details on the functions of these parts, refer to the pages given in parentheses ( ). Indicator 34, 36) Remote control signal transmitter 3) ZONE2 buttons····(36, 39) SURROUND MODE buttons 19, 27) Power buttons 8, 34) MAIN buttons 4, 36) ENGLISH Easy Setup and Operation • This section contains the basic steps necessary to configure the AVR-2106 according to your listening room environment and the source equipment and loudspeakers you are using. • For optimum performance, we recommend using the Auto Setup function. • If you wish, you can set the various settings manually without using Auto Setup ( page 48 ~ 53). Placing the speakers. Easy setup flow Auto setup flow Input source selector buttons 19, 34) Tuner system/System buttons 30, 35) Connecting the speakers. Mode selector switches 8, 33) Connecting a monitor and a DVD player. System buttons 33~35) SYSTEM SETUP/SETUP button 9, 34) Master volume control buttons 19, 39) MUTING button 19) Starting the Auto Setup. Cursor buttons 9, 22) ON SCREEN/DISPLAY button 20, 25, 34) TEST TONE button 50) VIDEO SELECT button 20) Input mode selector buttons 19, 20) SURROUND PARAMETER/System button 22, 34) CH SELECT/ENTER button 9, 23, 29) SURROUND BACK/ RETURN button···(24, 34) SPEAKER button 8, 20) DIMMER button 20) Playing a DVD with surround sound. MEMO • The Dolby Surround Pro Logic II(x) Cinema or Music mode can be chosen directly by pressing the CINEMA or MUSIC button on the remote control unit during playback in the Dolby Surround Pro Logic II(x) mode. • The DTS NEO:6 Cinema or Music mode can be chosen directly by pressing the CINEMA or MUSIC button on the remote control unit during playback in the DTS NEO:6 mode. • The main zone output can be turned on and off with the MAIN button. 4 ENGLISH Connecting a microphone. Measurement of the speakers in the listening position. 1) Speaker Configuration 2) Delay Time 3) Channel Level 4) Room EQ Check of the measurement result. Store the measurement result in the memory.
-
 1
1 -
 2
2 -
 3
3 -
 4
4 -
 5
5 -
 6
6 -
 7
7 -
 8
8 -
 9
9 -
 10
10 -
 11
11 -
 12
12 -
13
-
14
-
15
-
16
-
17
-
18
-
19
-
20
-
21
-
22
-
23
-
24
-
25
-
26
-
27
-
28
-
29
-
30
-
31
-
32
-
33
-
34
-
35
-
36
-
37
-
38
-
39
-
40
-
41
-
42
-
43
-
44
-
45
-
46
-
47
-
48
-
49
-
50
-
51
-
52
-
53
-
54
-
55
-
56
-
57
-
58
-
59
-
60
-
61
-
62
-
63
-
64
-
65
-
66
-
67
-
68
-
69
-
70
-
71
-
72
 |
 |