Denon DN S5000 Quick Start Guide - Page 10
English, Samp Rvs/flip/clr Button - manual
 |
UPC - 081757505185
View all Denon DN S5000 manuals
Add to My Manuals
Save this manual to your list of manuals |
Page 10 highlights
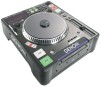
ENGLISH (3) Top panel CAUTION: • Note that there are many buttons working two different function selected by short time pushing or long pushing (1second or more). The mark indicates short time push function and mark indicates long time push function. o Play/Pause button (13) • This button will start or pause playback. • Push once to start playback, once again to pause playback, and once more to resume playback. !0 DISC EJECT, HOT DISC button • DISC EJECT: Eject disc with this button while button illumination light. Note that if illumination is off, you cannot eject disc.(Eject lock function) • HOT DISC: When the button is pressed and held in for more than 1 second during playback, the disc can be ejected. !1 CUE button • Pushing this button in play mode will force the track back to the position which playback started. While in search mode, it makes new Cue point. (Cue) • In Cue mode, by pushing the CUE button makes a Stutter sound from the Cue point. This is called Stutter play. (Stutter) !2 Platter/Scratch Disc Use this for the manual search, Pitch Bend and Scratch operations. • Platter: The Platter turns when playback of the source selected in the Scratch mode (Main or AlphaTrack) starts. • Scratch Disc: When Scratch Disc is turned, Scratch playback of the source selected in the Scratch mode (Main, Alpha-Track or Sampler) starts. NOTE: The Platter does not turn when the Scratch mode is set to the SAMPLER or the SEARCH mode. If "PLATTER off" is selected with the presettings, the Platter never turns, regardless of the Scratch mode. 8 CAUTIONS: • Do not forcibly try to stop the Platter when it is turning. Otherwise Platter moving mechanism may be damaged. • If a problem with Platter rotation arises when the Platter is turning, the Platter stops turning and the pause mode is set. !3 SCRATCH direction select knob Select the Scratch play direction. • BOTH: When Scratch Disc is turned, Scratch sound is output in both directions. • FWD: When Scratch Disc is turned, Scratch sound is output in the forward direction only. !4 SCRATCH source select knob Select the source for Scratch playback and the manual search/bend mode. • MAIN: Scratch Main Track sound • a TRACK: Scratch Alpha-Track sound • SAMP.: Scratch Sampler Track sound • SEARCH: When Scratch Disc is turned during playback, works as the pitch bend function. When Scratch Disc is turned in the pause or standby mode, works as the manual search function. Manual search works and you can move point by one frame (1/75 second) with sound. !5 FLIP/CLR button • FLIP: Use this to select operating mode of A1 and A2 buttons, from Hot Start mode and Stutter mode. FLIP LED lights up in Hot Start mode. • A1, A2 CLR: If the A1 or A2 button is pushed while pushing the FLIP button, you can clear the selected A point. By holding down just the FLIP button for more than 1 sec, you can clear A1 and A2 points all at once. !6 (SAMP) RVS/FLIP/CLR button • (SAMP)RVS: Use this to select the sample play direction forward and reverse. When select reverse RVS LED lights up. • FLIP: If in 4 Hot Start mode or Alpha-Track Hot Start mode, this button works as FLIP button for A3, A4. You can select Hot Start or Stutter mode. When Hot start mode is selected FLIP LED lights up. • A3, A4 CLR: If the A3 or A4 button is pushed while pushing the FLIP button, you can clear the selected A point. By holding down just the FLIP button for more than 1 sec, you can clear A3 and A4 points all at once. !7 A1 button !8 A2 button • Using these buttons you can create starting points for Hot Start, Seamless Loop, Stutter and Splice playback. • The button illumination changes its colour to inform different modes. Orange ..Hot Start mode Green ....Alpha-Track Hot Start mode Yellow....Splice mode !9 SAMP1/A3 button @0 SAMP2/A4 button • SAMP1/SAMP2: In the Sampler mode, push these buttons to record or play sound of Sampler 1 or 2. • A3, A4: When in the 4 Hot Start or Alpha-Track Hot Start modes, these act as A3 or A4 button. You can use these buttons for Hot Start, Seamless Loop and Stutter playback. • These 2 buttons illumination colour changes in the different modes. Orange ..4 Hot Start mode Green ....Alpha-Track Hot Start or Sampler mode @1 B button • Use this to set the B point for A1 and A2 Seamless Loop and splice playback end. • The B LED indicates conditions about B point. B LED lit: Already B point was set. B LED flashing: In Splice point setting mode @2 (SAMP) B, B button • (SAMP)B: In the Sampler mode, use this to set the Sampler loop B point. • B: In the 4 Hot Start or Alpha-Track Hot Start modes, use this to set the B point for A3 or A4 button Seamless Looping. @3 A/B TRIM, SPLICE button • A/B TRIM: With a short push of this button, the A and B point trim mode changes on and off while in PLAY or CUE mode. • SPLICE: When pushed for more than 1 sec , Splice point setting mode for A1 and A2 starts. @4 (SAMP) EXIT/RELOOP, EXIT/RELOOP button • (SAMP)EXIT/RELOOP: Use this to turn the Sampler Loop mode on and off. Also acts as EXIT/RELOOP button for Sampler Loop to exit or back again. • EXIT/RELOOP: In the 4 Hot Start or Alpha-Track Hot Start modes, use this to exit or back again Seamless Loop for A3 and A4. • EXIT/RELOOP LED indicates conditions of loop. EXIT/RELOOP LED lit: Seamless Loop on or playing. EXIT/RELOOP LED flashing: Playback after exit loop. @5 EXIT/RELOOP button • Use this to exit, back again to Seamless Loop playback for A1 and A2 with keeping all loop settings. You can add variety looping with this function. • The LED indicates what's going on about looping. EXIT/RELOOP LED lit: Seamless Loop on or playing. EXIT/RELOOP LED flashing: Playback after exit loop. • This button also switches repeat play modes on and off in Program, Random mode. @6 A3/4, PITCH/VOL button • A3/4: After a short push, A3, A4 button operating mode can be selected with the PARAMETERS knob from Sampler, 4 Hot Start, Alpha-Track Hot Start. • PITCH/VOL: After pushing for more than 1 sec, pitch and output level of Sampler, Alpha-Track playback can be adjusted with the PARAMETERS knob.
-
 1
1 -
2
-
3
-
4
-
 5
5 -
 6
6 -
 7
7 -
 8
8 -
 9
9 -
 10
10 -
 11
11 -
 12
12 -
 13
13 -
 14
14 -
 15
15 -
16
-
17
-
18
-
19
-
20
-
21
-
22
-
23
-
24
-
25
-
26
-
27
-
28
-
29
-
30
-
31
-
32
-
33
-
34
-
35
-
36
-
37
-
38
-
39
-
40
-
41
-
42
-
43
-
44
-
45
-
46
-
47
-
48
-
49
 |
 |
