Denon DN S5000 Quick Start Guide - Page 20
A/ B TRIM, A/B move, A/B Trim
 |
UPC - 081757505185
View all Denon DN S5000 manuals
Add to My Manuals
Save this manual to your list of manuals |
Page 20 highlights
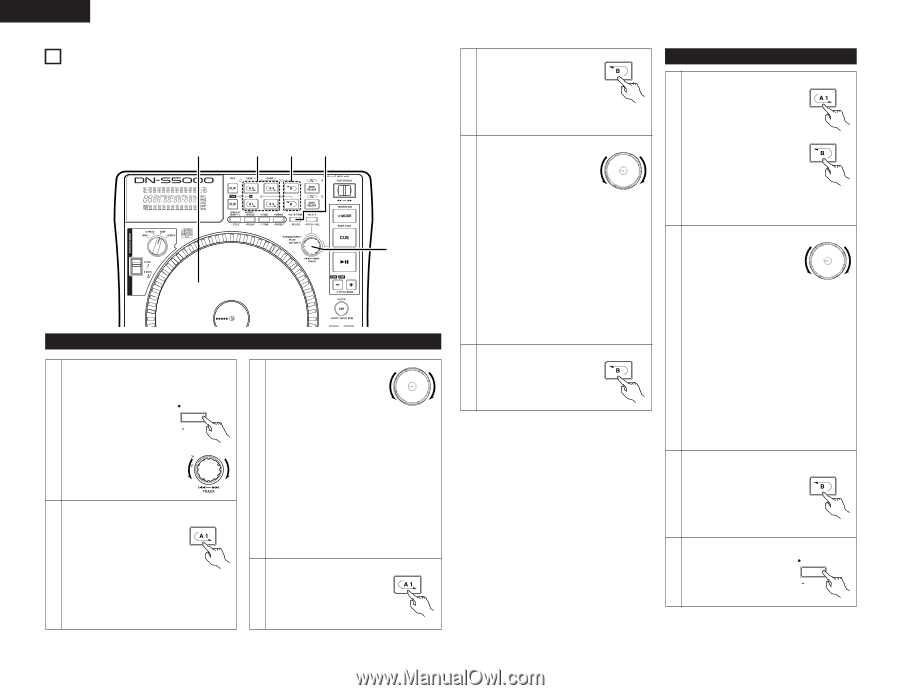
ENGLISH 10 A/B TRIM • The Seamless Loop, Sampler loop and splice A and B points can be fine-adjusted using Scratch Disc. • There are two ways for doing this. A-B Trim: Trim the points during loop playback as a rehearsal. A/B Move: Move the points using the fast search or manual search. A/B Move can not be used with Sampler loop. e, t, y, i, r, u, !1 o, !2 !0, !2 q, !3 w A/B Trim Select A-B trim mode First select whether to adjust the A and B points using the A-B trim mode or the A/B move mode. A / B TRIM q Push the A/B TRIM button 1 to set the A and B point SPLICE position adjustment mode. w Now turn the PARAMETERS knob to select the A-B Trim or the A/B Move. PARAMETERS PUSH ON / OFF Select A point (in A-B Trim) e Select the A-B Trim and push the corresponding A button for the loop to be trimmed. The A button illumination 2 flashes and loop playback starts. • In the splice trim mode, total 6 seconds of spliced section (started from 2 seconds before A point to 4 seconds after the B point) is played. Trim A point r Turn the Scratch Disc to move the A point 1 frame at a time. • Range for trimming A point is limited as follows. A point for Loop: ±30 frames from the original A point. 3 (However, when the A point was loaded from the standby mode, the A point cannot be moved backwards. So, use A/B Move function) A point for Splice: Between the beginning of the disc and 5 frames before B point. A point for Sampler: Between the original A point and 5 frames before B point. Save the A point t Push the A button again to 4 save new A point, and the unit automatically exit from the A-B Trim mode. Select B point (in A-B Trim) y Select the A-B Trim mode and to select the B point, 5 push the B button after selecting the A point. Then push the B button. The B LED flashes and the B point trim become enable. Trim B point u Turn Scratch Disc to move the B point 1 frame at a time. • Range for trimming B point is limited as follows. B point for Loop: Between 5 frames after A point and 6 disc end. B point for Splice: ±30 frames from the original B point. (However, when the B point was loaded from the standby mode, the B point cannot be moved backwards. So, use A/B Move function) B point for Sampler: Between 5 frames after A point and Sampler end. Save the B point i Push the B button again to 7 save new B point, and the unit automatically exit from finish the A-B Trim mode. A/B move Select A and B points o Select or the A/B Move and push the A button for the A point you want to move. The standby mode is set at the A point and the A button 8 illumination flashes. !0 To select the B point, push the B button after selecting the A point. • The B LED flashes. The Selected B point is used for the A1 or A2 point that was first selected. Move A or B points !1 Turn the Scratch Disc to move the selected point using the manual search function. • Range for moving A point is limited as follows. A point for Loop: Between the beginning of the disc and 5 frames before B point. 9 A point for Splice: Between the beginning of the disc and 5 frames before B point • Range for moving B point is limited as follows. B point for Loop: Between 5 frames after A point and disc end B point for Splice: Between 5 frames after A point and disc end Save the A or B points !2 Push the A1/A2 or B button again. The LED stops 10 flashing and the A1/A2 or B point is saved, and the unit automatically exit from the A/B Move mode. Cancel the A-B Trim or A/B Move !3 Push the A/B TRIM button A / B TRIM 11 to cancel the mode. SPLICE 18
-
 1
1 -
2
-
3
-
4
-
5
-
6
-
7
-
8
-
9
-
10
-
11
-
12
-
13
-
14
-
 15
15 -
 16
16 -
 17
17 -
 18
18 -
 19
19 -
 20
20 -
 21
21 -
 22
22 -
 23
23 -
 24
24 -
 25
25 -
26
-
27
-
28
-
29
-
30
-
31
-
32
-
33
-
34
-
35
-
36
-
37
-
38
-
39
-
40
-
41
-
42
-
43
-
44
-
45
-
46
-
47
-
48
-
49
 |
 |