E-Z-GO RXV - Gas Owner Manual - Page 37
Check Oil Level on Dipstick
 |
View all E-Z-GO RXV - Gas manuals
Add to My Manuals
Save this manual to your list of manuals |
Page 37 highlights
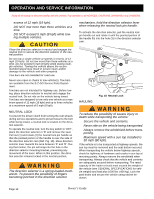
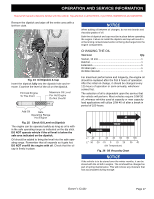
B OPERATION AND SERVICE INFORMATION Read all of manual to become familiar with this vehicle. Pay attention to all NOTICES, CAUTIONS, WARNINGS and DANGERS. Remove the dipstick and wipe off the entire area with a lint-free cloth. NOTICE B When adding oil between oil changes, do not mix brands and viscosity grades of oil. Both the oil dipstick and cap must be in place before operating the engine. Failure to install the dipstick and cap will result in oil becoming contaminated and/or oil being discharged into the engine compartment. CHANGING THE OIL Tool List Qty. Socket, 10 mm 1 Ratchet 1 Extension 1 Oil drain pan 1 Oil Filter Wrench 1 Fig. 24 Oil Dipstick & Cap Insert the dipstick fully into the dipstick hole and remove. Examine the level of the oil on the dipstick. Fill Cold Engine To This Point Maximum Oil Level For Hot Engine Do Not Overfill For maximum performance and longevity, the engine oil should be replaced after the first 8 hours of operation. After the initial oil change, it should be changed every 125 hours of operation or semi-annually, whichever comes first. The selection of oil is dependent upon the service that the vehicle will perform. Most vehicles require 10W-30 oil, whereas vehicles used at capacity or near capacity load applications will utilize 10W-40 oil after a break-in period of 100 hours. Add Oil Safe Operating Range Hot Engine Fig. 25 Check Oil Level on Dipstick The engine can be operated safely as long as oil is within the safe operating range as indicated on the dip stick. DO NOT operate vehicle if the oil level is below the safe area indicated on the dipstick. Oil should be added to bring the level into the safe operating range. Remember that oil expands as it gets hot. DO NOT overfill the engine with oil. Check that the oil cap is firmly in place. 5W-30 30 10W-30 F 0 -20 0 20 40 60 80 100 C0 -30 -20 -10 0 10 20 (Air Temperature) 30 40 Fig. 26 Oil Viscosity Chart NOTICE If the vehicle is to be stored over the winter months, it can be stored with the oil left in engine. The oil should be changed as part of spring maintenance. This will remove any moisture that has accumulated during storage. Owner's Guide Page 17
-
 1
1 -
2
-
3
-
4
-
5
-
6
-
7
-
8
-
9
-
10
-
11
-
12
-
13
-
14
-
15
-
16
-
17
-
18
-
19
-
20
-
21
-
22
-
23
-
24
-
25
-
26
-
27
-
28
-
29
-
30
-
31
-
 32
32 -
 33
33 -
 34
34 -
 35
35 -
 36
36 -
 37
37 -
 38
38 -
 39
39 -
 40
40 -
 41
41 -
 42
42 -
43
-
44
-
45
-
46
-
47
-
48
-
49
-
50
-
51
-
52
-
53
-
54
-
55
-
56
-
57
-
58
-
59
-
60
 |
 |
