E-Z-GO RXV - Gas Owner Manual - Page 39
Air Cleaner Inspection And Replace, Cleaning The Air Filter Element
 |
View all E-Z-GO RXV - Gas manuals
Add to My Manuals
Save this manual to your list of manuals |
Page 39 highlights
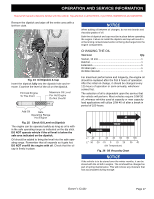
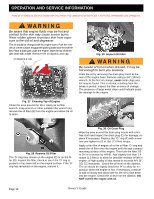
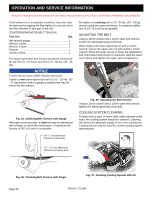
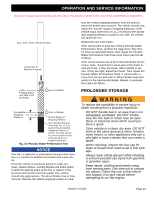
B OPERATION AND SERVICE INFORMATION Read all of manual to become familiar with this vehicle. Pay attention to all NOTICES, CAUTIONS, WARNINGS and DANGERS. B Do not overfill engine. Too much oil may cause smoking or allow oil to enter the air filter enclosure. To fuel Tank Air Filter Canister Fig. 32 Air Cleaner CLEANING THE AIR FILTER ELEMENT Fig. 31 Add Engine Oil The oil dipstick and cap must be in place before operating the engine. Failure to install the dipstick and cap will result in oil being discharged into the engine compartment. As a final check, check the oil level again with the vehicle on level ground. Like all liquids, oil increases in volume when warm. The full 'H' mark on the dipstick is calibrated for an engine at operating temperature. When the engine is cold, the oil will be below the full mark. The engine can be operated safely as long as the oil is within the safe operating range as indicated on the dipstick. DO NOT operate the vehicle if the oil level is below the safe area indicated on the dipstick. AIR CLEANER INSPECTION AND REPLACEMENT NOTICE The air cleaner unit on the vehicle is a dry unit. DO NOT use oil on the filter element or any part of the unit. DO NOT use compressed air to clean the air filter. Doing so will damage the filter and will cause damage the engine. The air cleaner element is accessible by unsnapping the clips on the air canister and removing the cover and air filter element. Clean inside of cover, canister and dust collector. Install the element and cover the same way they were removed. Be sure the positioning arrow on cover is pointing upward and all clips are fastened securely Air Cleaner Air Filter Element Air Cleaner Dust Cover Collector Fig. 33 .Air Cleaner Assembly Owner's Guide Page 19
-
 1
1 -
2
-
3
-
4
-
5
-
6
-
7
-
8
-
9
-
10
-
11
-
12
-
13
-
14
-
15
-
16
-
17
-
18
-
19
-
20
-
21
-
22
-
23
-
24
-
25
-
26
-
27
-
28
-
29
-
30
-
31
-
32
-
33
-
 34
34 -
 35
35 -
 36
36 -
 37
37 -
 38
38 -
 39
39 -
 40
40 -
 41
41 -
 42
42 -
 43
43 -
 44
44 -
45
-
46
-
47
-
48
-
49
-
50
-
51
-
52
-
53
-
54
-
55
-
56
-
57
-
58
-
59
-
60
 |
 |
