Electrolux E42BS75ETT Owners Manual - Page 10
Aboutthe ice and water dispenserand automaticicemaker. - bags
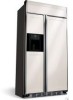 |
View all Electrolux E42BS75ETT manuals
Add to My Manuals
Save this manual to your list of manuals |
Page 10 highlights
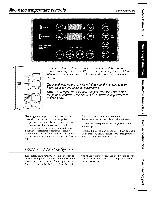
Aboutthe ice and water dispenserand automaticicemaker. A newly installed refrigerator may take 12 to 24 hours to begin making ice. AccessDoor/_.-IceStorag_Bin //- "L/2 Mechanism Ice Storage Bin To remove: Lift up the access door to reach the icemaker. Set tile iceinaker power switch to the O (0f/) position. With the access door closed, support the storage bin at the bottom while slightly lifting. Pull bin straight out. Toreplace: Slkle the bin back until the tab on the bin locks into the slot on the shelf. If the bin does not go all the way back, reinove it and rotate tile drive mechanisin 1/4 turn. Then push the bin back again. Important facts about your ice and water dispenser Do not add ice fl'oln trays or bags to tile storage bin. It inay not crush or dispense well. Avoid overfilling glass with ice eald use of narrow or extra-tall glasses. Backed-up ice can jam tile chute or cause tile door in tile chute to freeze shut. If ice Lsblocking tile chute, poke it through with a wooden spoon. Beverages and foods should not be quick-chilled M tile ice storage bin. Caals, bottles or food packages in the storage bin may cause the iceinaker or auger to jean. {{{T{o{{keep dispensed ice fl'om missing the glass, put the glass close to, but not touchMg, the dispenser opening. {{{S{o{m{e crushed ice may be dispensed even though you selected Cubed Ice. This hal)pens occasionally when a few cubes accidentally get dit'ected to the cI'usheI', {{{A{f{t{er crushed ice is dispensed, soine water inay drip fl'oin the chute. {{{T{h{e{ first glass of water dispensed may be wariner than the following ones. This is norinal. Automatic Icemaker A newly-installed refrigerator may take 12-24 hours tobegin making ice. Power Tile iceinaker will produce seven cubes per cycle--approxitnately 15 cycles or more in a 24-hour period, depending on fl'eezer colnpartlnent tenlperature, i'OOlil temperature, number of door openings ealcl other use conditions. If tile refl'igerator is operated before tile water connection is inade to tile iceinakei; set the power switch to O (off). When the refl'igerator has been connected to the water supply, set the power switch to ! (on). Tile green light will come on. Throw away the fit'st fldl bucket of ice. Be sure nothing interferes with the sweep of the feeler re'In. When tile bin fills to tile level of tile feeler aa'in, the iceinaker will stop producing ice. It is normal for several cubes to bejoined together. r Green PowerLight FeelerArm If ice is not used fl'equently, old ice cubes will becoine cloudy, taste stale and shrMk. After tile icemaker has been turned on again, there will be a delay of about 45 illitlutes before tile iceinaker resumes operations. NOTE: In homes with lower-than-average water pressure, you inay heaa" the icemaker water valve cycle on several tithes when inakitlg one batch of ice. Recommended water pressure is 60 psi. 10
-
 1
1 -
2
-
3
-
4
-
 5
5 -
 6
6 -
 7
7 -
 8
8 -
 9
9 -
 10
10 -
 11
11 -
 12
12 -
 13
13 -
 14
14 -
 15
15 -
16
-
17
-
18
-
19
-
20
-
21
-
22
-
23
-
24
-
25
-
26
-
27
-
28
-
29
-
30
-
31
-
32
-
33
-
34
-
35
-
36
-
37
-
38
-
39
-
40
-
41
-
42
-
43
-
44
 |
 |
