Electrolux E42BS75ETT Owners Manual - Page 34
Install, Handles, Stainless, Steel, Models
 |
View all Electrolux E42BS75ETT manuals
Add to My Manuals
Save this manual to your list of manuals |
Page 34 highlights
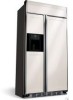
Installation Instructions INSTALL DOOR HANDLES ON STAINLESS STEEL MODELS 1, Remove handles from cartonin 9 and any other protective packagin 9. 2, Place handle over pre-installed shoulder bolts (A) that are fastened into door in four locations, 3, While supporting handle and Iookin 9 at upper end cap, fasten top-most allen set screw (B) with supplied allen wrench, then fasten bottom allen set screw (C), See Figure 1, 4, Repeat Step 3 with bottom end cap using allen set screws (D and E), once upper section of handle is firmly secured to door, See Figure 2, 5, All set screws should be tightened and sub-flush (allen set screw should be buried just below the surface of the end cap) of handle end cap, The end caps should be drawn tight to freezer and refrigerator doors with no gaps, Figure 1 Upper End Cap Figure 2 Bottom End Cap 34
-
 1
1 -
2
-
3
-
4
-
5
-
6
-
7
-
8
-
9
-
10
-
11
-
12
-
13
-
14
-
15
-
16
-
17
-
18
-
19
-
20
-
21
-
22
-
23
-
24
-
25
-
26
-
27
-
28
-
 29
29 -
 30
30 -
 31
31 -
 32
32 -
 33
33 -
 34
34 -
 35
35 -
 36
36 -
 37
37 -
 38
38 -
 39
39 -
40
-
41
-
42
-
43
-
44
 |
 |
