Epson 3LCD User Manual - Page 26
Using the Operation Lock, Turn User's Logo Protect on., Enter the password. - projector user guide
 |
UPC - 010343857827
View all Epson 3LCD manuals
Add to My Manuals
Save this manual to your list of manuals |
Page 26 highlights
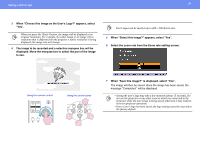
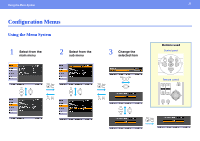
Security Functions 26 and re-enter the time. When you have finished using the "Password Protect" menu, the countdown for the elapsed time will start. 4 Turn "User's Logo Protect" on. (1) Select "User's Logo Protect", and then press the [Enter] button. (2) Select "On", and then press the [Enter] button. (3) Press the [Esc] button. 5 Enter the password. (1) To set a password, select "Password" and then press the [Enter] button. (2) The message "Change the password?" will be displayed, so select "Yes" and then press the [Enter] button. The default setting for the password is "0000", but you should change this to your own desired password. If you select "No", the screen shown at step 1 will be displayed again. (3) While holding down the [Num] button, use the numeric keypad buttons to enter a 4-digit number. The number entered will be displayed as "* * * *". Once four digits have been entered, the confirmation screen will be displayed. (4) Re-enter the password. The message "The new password is stored." will be displayed. If you enter the password incorrectly, a message will be displayed prompting you to re-enter the password. Using the Operation Lock This function locks the buttons on the projector's control panel. You can use it when projecting at tradeshows or in schools, so that projection can be carried out without interruption. 1 From the configuration menu, select "Settings" - "Operation Lock". Check the buttons you can use and the operations they perform in the guide at the bottom of the screen. Using the remote control Using the control panel 2 Set to "On". If set to "On", none of the buttons on the control panel except the [Power] button can be operated.
-
 1
1 -
2
-
3
-
4
-
5
-
6
-
7
-
8
-
9
-
10
-
11
-
12
-
13
-
14
-
15
-
16
-
17
-
18
-
19
-
20
-
 21
21 -
 22
22 -
 23
23 -
 24
24 -
 25
25 -
 26
26 -
 27
27 -
 28
28 -
 29
29 -
 30
30 -
 31
31 -
32
-
33
-
34
-
35
-
36
-
37
-
38
-
39
-
40
-
41
-
42
-
43
-
44
-
45
-
46
-
47
-
48
-
49
-
50
-
51
-
52
-
53
-
54
-
55
-
56
-
57
-
58
-
59
-
60
-
61
-
62
-
63
-
64
-
65
-
66
-
67
-
68
-
69
 |
 |
