Epson 3LCD User Manual - Page 33
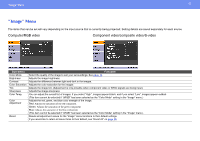
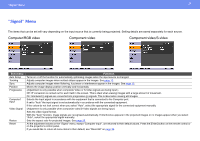
\, Computer/RGB video, Component video, Component video/S-video
 |
UPC - 010343857827
View all Epson 3LCD manuals
Add to My Manuals
Save this manual to your list of manuals |
Page 33 highlights
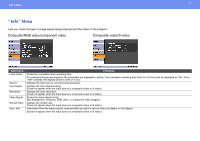
"Signal" Menu 33 "Signal" Menu The items that can be set will vary depending on the input source that is currently being projected. Setting details are saved separately for each source. Computer/RGB video Component video Component video/S-video Sub-menu Auto Setup Tracking Sync. Position Progressive Computer1 Input Video Signal Resize Reset Function Turns on or off the function for automatically optimizing images when the input source is changed. Adjusts computer images when vertical stripes appear in the images. See page 12. Adjusts computer images when flickering, fuzziness or interference appear in the images. See page 13. Moves the image display position vertically and horizontally. (Adjustment is only possible when composite Video or S-Video signals are being input.) Off: IP conversion is carried out for each field in the screen. This is ideal when viewing images with a large amount of movement. On: Interlaced (i) signals are converted into progressive (p) signals. This is ideal when viewing still images. Selects the input signal in accordance with the equipment that is connected to the Computer port. If set to "Auto" the input signal is set automatically in accordance with the connected equipment. If the colors do not look correct when you select "Auto", select the appropriate signal for the connected equipment manually. (Adjustment is only possible when composite video/S-Video signals are being input.) Sets the video signal format. With the "Auto" function, image signals are recognized automatically. If interference appears in the projected images or no images appear when you select "Auto", select the appropriate signal manually. Sets the aspect ratio for projected images. See page 20. All the adjustment values on the "Signal" menu, except "Computer Input", are returned to their default values. Press the [Enter] button on the remote control or on the projector's control panel. If you would like to return all menu items to their default, see "Reset All" on page 38.
-
 1
1 -
2
-
3
-
4
-
5
-
6
-
7
-
8
-
9
-
10
-
11
-
12
-
13
-
14
-
15
-
16
-
17
-
18
-
19
-
20
-
21
-
22
-
23
-
24
-
25
-
26
-
27
-
 28
28 -
 29
29 -
 30
30 -
 31
31 -
 32
32 -
 33
33 -
 34
34 -
 35
35 -
 36
36 -
 37
37 -
 38
38 -
39
-
40
-
41
-
42
-
43
-
44
-
45
-
46
-
47
-
48
-
49
-
50
-
51
-
52
-
53
-
54
-
55
-
56
-
57
-
58
-
59
-
60
-
61
-
62
-
63
-
64
-
65
-
66
-
67
-
68
-
69
 |
 |
