Epson 7850p Product Information Guide - Page 14
Enter, Start > Control Panel >, Network and Internet Connections, Network Connections - digital projector
 |
UPC - 010343845992
View all Epson 7850p manuals
Add to My Manuals
Save this manual to your list of manuals |
Page 14 highlights
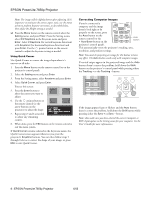
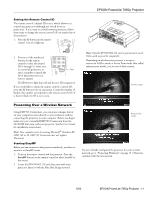
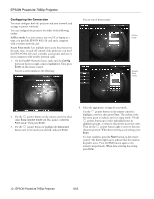
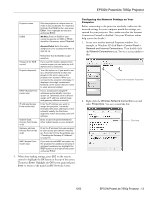
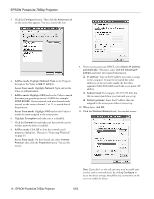
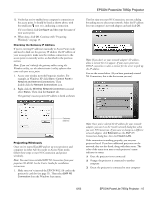
EPSON PowerLite 7850p Projector Projector name ESSID Give the projector a unique name to make it easy to identify. To rename it, highlight the Clear button and press Enter. Then highlight the text box and press Enter. Ad Hoc: Enter an ESSID if your network supports an SSID or ESSID identifier. Otherwise, select Channel. Access Point: Enter the name assigned to your access point when it was set up. Password for WEB control Projector keyword DHCP (Access Point mode only) IP address (Access Point mode only) Subnet mask. (Access Point mode only) Gateway address (Access Point mode only) WEP (Access Point mode only) Remember that the ESSID is casesensitive. If you want to create a password for remote access, you can enter up to 8 alphanumeric characters. Turn this option on if you want to set up a security keyword so that only people in the same room as the projector can access it. When you connect to the projector wirelessly, it displays a four-digit randomized keyword on the screen that you need to enter when prompted. If your access point assigns IP addresses automatically, turn this option on. Otherwise, turn it off and assign an IP address, subnet mask, and gateway address manually. Enter the IP address you want to assign the projector. It must be formatted like other addresses on the network; usually the first three segments match the access point's IP address. Enter a subnet mask formatted like other subnet masks on your network. Enter the IP address that was assigned to your access point when it was set up. If you don't know the address, see "Checking the Gateway IP Address" on page 15. If you want to add WEP encryption on the projector for additional security of wireless transmissions, highlight the WEP button on the right of the screen and press Enter. 5. When done making settings, press ESC on the remote control to highlight the OK button at the top of the screen. Then press Enter. Highlight the OK button again and press Enter to return to the main EasyMP Network Screen. Configuring the Network Settings on Your Computer Before connecting to the projector wirelessly, make sure the network settings for your computer match the settings you entered for your projector. Also, make sure that the Internet Connection Firewall is disabled. (See your Windows online help system for details.) 1. Access your wireless network Properties window. For example, in Windows XP click Start > Control Panel > Network and Internet Connections. Then double-click the Network Connections icon. You see a screen similar to this: Right-click and select Properties 2. Right-click the Wireless Network Connection icon and select Properties. You see a screen like this: Click here 6/03 EPSON PowerLite 7850p Projector - 13
-
 1
1 -
2
-
3
-
4
-
5
-
6
-
7
-
8
-
 9
9 -
 10
10 -
 11
11 -
 12
12 -
 13
13 -
 14
14 -
 15
15 -
 16
16 -
 17
17 -
 18
18 -
 19
19 -
20
-
21
-
22
-
23
-
24
-
25
 |
 |
