Epson 7850p Product Information Guide - Page 24
Resetting the Lamp Timer, replace the cover. The projector won't come on if the lamp
 |
UPC - 010343845992
View all Epson 7850p manuals
Add to My Manuals
Save this manual to your list of manuals |
Page 24 highlights
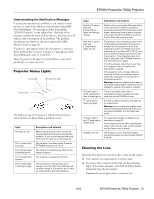
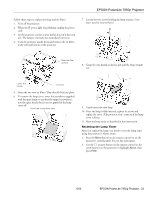
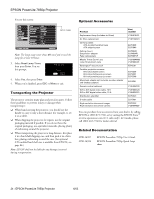
EPSON PowerLite 7850p Projector Follow these steps to replace the lamp and air filters: 1. Turn off the projector. 2. When the P power light stops flashing, unplug the power cord. 3. Let the projector cool for at least half an hour (if it has been on). The lamp is extremely hot immediately after use. 4. Turn the projector upside-down and remove the air filters at the side and bottom of the projector. 7. Loosen the two screws holding the lamp in place. (You don't need to remove them.) Slide the filter up here . . . 8. Grasp the wire handle as shown and pull the lamp straight out. Lower the handle . . . and here 5. Insert the two new air filters. They should click into place. 6. To remove the lamp cover, insert the screwdriver supplied with the spare lamp (or another flat-tipped screwdriver), into the space beside the air vent to gently lift the lamp cover off. Insert the screwdriver here 1 9. Gently insert the new lamp. 10. Once the lamp is fully inserted, tighten its screws and replace the cover. (The projector won't come on if the lamp cover is loose.) 11. Reset the lamp timer as described in the next section. Resetting the Lamp Timer After you replace the lamp, you need to reset the lamp timer using the projector's About menu. 1. Press the Menu button on the remote control (or on the projector's control panel). You see the main menu. 2. Use the pointer button on the remote control (or the arrow buttons on the projector) to highlight About, then press Enter. 6/03 EPSON PowerLite 7850p Projector - 23
-
 1
1 -
2
-
3
-
4
-
5
-
6
-
7
-
8
-
9
-
10
-
11
-
12
-
13
-
14
-
15
-
16
-
17
-
18
-
 19
19 -
 20
20 -
 21
21 -
 22
22 -
 23
23 -
 24
24 -
 25
25
 |
 |
