Epson 7850p Product Information Guide - Page 8
Adjusting the Image, Focusing and Zooming Your Image, Adjusting the Height of Your Image - powerlite projector manual
 |
UPC - 010343845992
View all Epson 7850p manuals
Add to My Manuals
Save this manual to your list of manuals |
Page 8 highlights
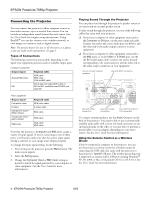
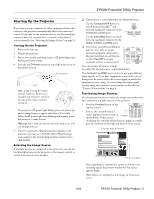
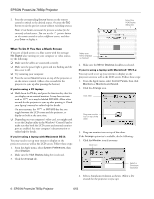
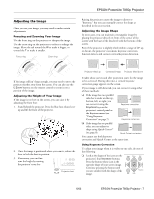
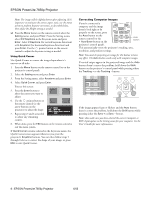
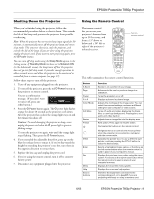
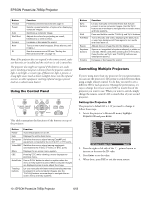
Adjusting the Image Once you see your image, you may need to make certain adjustments. Focusing and Zooming Your Image Use the focus ring on the projector to sharpen the image. Use the zoom ring on the projector to reduce or enlarge the image. Move the tab toward the W to make it bigger, or toward the T to make it smaller. Focus ring Zoom ring EPSON PowerLite 7850p Projector Raising the projector causes the image to distort or "keystone," but you can manually correct the shape as described in the next section. Adjusting the Image Shape In most cases, you can maintain a rectangular image by placing the projector directly in front of the center of the screen with the base of the lens level with the bottom of the screen. Even if the projector is slightly tilted (within a range of 40° up or down), the projector's automatic keystone correction function detects and corrects vertical keystone distortion. If the image still isn't large enough, you may need to move the projector farther away from the screen. You can also use the E-Zoom buttons on the remote control to zoom in on a portion of the image. Adjusting the Height of Your Image If the image is too low on the screen, you can raise it by adjusting the front foot: 1. Stand behind the projector. Press the blue foot release lever up and lift the front of the projector. 2. Once the image is positioned where you want it, release the lever to lock the foot in position. 3. If necessary, you can finetune the height by turning the projector's rear feet. Projector foot Projector tilted up Corrected image Projector tilted down It takes about one second after projection starts for the image to be corrected. During this time, a vertical keystone correction gauge appears on the screen. If your image is still distorted, you can correct it using either of these methods: ❏ If the image has two parallel sides but is wider on the top, bottom, left, or right, you can correct it using the Keystone keys on the projector's control panel or the Keystone menu (see "Using Keystone Correction" on page 7). Keystone correction Keystone correction ❏ If the image has no parallel sides, you can adjust its shape using Quick Corner™ (see page 8). Quick Corner correction You cannot use both keystone correction and Quick Corner at the same time. Using Keystone Correction To adjust your image when it is wider on one side, do one of the following: ❏ Look at the shapes of the icons on the projector's four Keystone buttons. Press the button whose icon is the opposite shape of your screen image. Continue pressing the button until you are satisfied with the shape of the image. 6/03 EPSON PowerLite 7850p Projector - 7
-
 1
1 -
2
-
 3
3 -
 4
4 -
 5
5 -
 6
6 -
 7
7 -
 8
8 -
 9
9 -
 10
10 -
 11
11 -
 12
12 -
 13
13 -
14
-
15
-
16
-
17
-
18
-
19
-
20
-
21
-
22
-
23
-
24
-
25
 |
 |