Epson 9600 Product Support Bulletin(s) - Page 43
Application Example, NOTE: On the MAC platform - drivers for windows 7
 |
UPC - 010343841888
View all Epson 9600 manuals
Add to My Manuals
Save this manual to your list of manuals |
Page 43 highlights
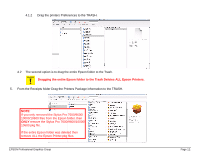
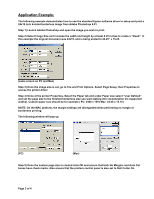
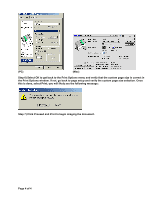
Application Example: The following example demonstrates how to use the standard Epson software driver to setup and print a 24x15 inch 4-sided borderless image from Adobe Photoshop 6.01. Step 1) Launch Adobe Photoshop and open the image you wish to print. Step 2) Select Image Size and increase the width and height by at least 0.25 inches to create a "bleed". In this example the original document was 24x15, and is being scaled to 24.25" x 15.25. (same screen on PC and Mac) Step 3) Once the image size is set, go to File and Print Options. Select Page Setup, then Properties to access the printer driver. Step 4) Once at the printer Properties, Select the Paper tab and under Paper size select "User Defined" and set the page size to the finished borderless size you want (taking into consideration the supported widths). Custom paper size should be for example ( PC: 2400 x 1510 Mac: 24.00 x 15.10 ) NOTE: On the MAC platform, the margin settings are disregarded when performing no margin or borderless printing. The following window will pop up (PC) (Mac) Step 5) Once the custom page size is created click OK and ensure that both No Margins and Auto Cut boxes have check marks. Also ensure that the printers control panel is also set to Roll Cutter On. Page 3 of 4
-
 1
1 -
2
-
3
-
4
-
5
-
6
-
7
-
8
-
9
-
10
-
11
-
12
-
13
-
14
-
15
-
16
-
17
-
18
-
19
-
20
-
21
-
22
-
23
-
24
-
25
-
26
-
27
-
28
-
29
-
30
-
31
-
32
-
33
-
34
-
35
-
36
-
37
-
 38
38 -
 39
39 -
 40
40 -
 41
41 -
 42
42 -
 43
43 -
 44
44 -
 45
45 -
 46
46 -
 47
47 -
 48
48 -
49
-
50
-
51
-
52
-
53
-
54
-
55
-
56
-
57
-
58
-
59
-
60
-
61
-
62
-
63
-
64
-
65
-
66
-
67
-
68
-
69
-
70
-
71
-
72
-
73
-
74
-
75
-
76
-
77
-
78
-
79
-
80
-
81
-
82
-
83
-
84
-
85
-
86
-
87
-
88
-
89
-
90
-
91
-
92
-
93
-
94
-
95
-
96
-
97
-
98
-
99
-
100
-
101
-
102
-
103
-
104
 |
 |
