Epson C31CA85090 Software User Guide - Page 106
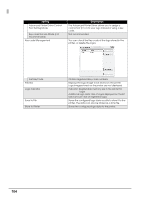
The [Logo Edit] screen appears. Click the [Monochrome] or [Multi-tone] button
 |
View all Epson C31CA85090 manuals
Add to My Manuals
Save this manual to your list of manuals |
Page 106 highlights
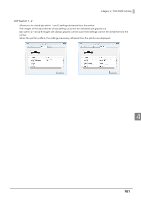
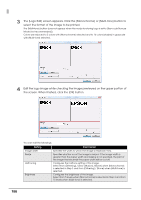
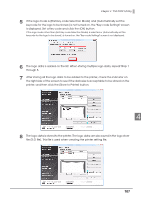
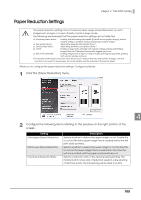
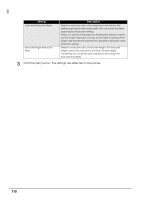
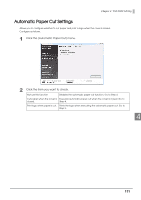
3 The [Logo Edit] screen appears. Click the [Monochrome] or [Multi-tone] button to select the format of the image to be printed. The [Multi-tone] button does not appear when the mode for storing logo is set to [Key-code Nonuse Mode (not recommended)]. Colors are reduced to 2 colors with [Monochrome] selected and to 16 colors (shades) in grayscale with [Multi-tone] selected. 4 Edit the logo image while checking the image previewed on the upper portion of the screen. When finished, click the [OK] button. You can edit the followings. Setting Image width Resize Half toning Brightness Description Specifies the width to which the image is resized (in mm). Specifies whether or not the image is resized. If the image width is greater than the paper width and resizing is not specified, the part of the image that exceeds the paper width will be cut off. Configures the halftone setting of the image. Select from [Dithering] / [Error diffusion] /[None] when [Monochrome] is selected in Step 3 and from [Dithering] / [None] when [Multi-tone] is selected. Configures the brightness of the image. Select from 5 levels when [Monochrome] is selected in Step 3 and from 15 levels when [Multi-tone] is selected. 106
-
 1
1 -
2
-
3
-
4
-
5
-
6
-
7
-
8
-
9
-
10
-
11
-
12
-
13
-
14
-
15
-
16
-
17
-
18
-
19
-
20
-
21
-
22
-
23
-
24
-
25
-
26
-
27
-
28
-
29
-
30
-
31
-
32
-
33
-
34
-
35
-
36
-
37
-
38
-
39
-
40
-
41
-
42
-
43
-
44
-
45
-
46
-
47
-
48
-
49
-
50
-
51
-
52
-
53
-
54
-
55
-
56
-
57
-
58
-
59
-
60
-
61
-
62
-
63
-
64
-
65
-
66
-
67
-
68
-
69
-
70
-
71
-
72
-
73
-
74
-
75
-
76
-
77
-
78
-
79
-
80
-
81
-
82
-
83
-
84
-
85
-
86
-
87
-
88
-
89
-
90
-
91
-
92
-
93
-
94
-
95
-
96
-
97
-
98
-
99
-
100
-
 101
101 -
 102
102 -
 103
103 -
 104
104 -
 105
105 -
 106
106 -
 107
107 -
 108
108 -
 109
109 -
 110
110 -
 111
111 -
112
-
113
-
114
-
115
-
116
-
117
-
118
-
119
-
120
-
121
-
122
-
123
-
124
-
125
-
126
-
127
-
128
 |
 |
