Epson C31CA85090 Software User Guide - Page 92
Autocutter, Making Autocutter Setting
 |
View all Epson C31CA85090 manuals
Add to My Manuals
Save this manual to your list of manuals |
Page 92 highlights
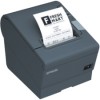
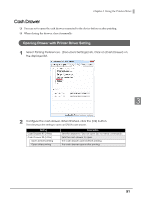
Autocutter You can set when to cut paper with the autocutter. Making Autocutter Setting 1 Select Printing Preferences - [Document Settings] tab. Click on [Paper Source] on the displayed list. 2 Make the autocutter setting. When finished, click the [OK] button. Setting Document[Feed,Cut] Document[Feed,No Cut] Document[No Feed,Cut] Document[No Feed,No Cut] Page[Feed,Cut] Page[Feed,No Cut] Page[No Feed,Cut] Custom Description The paper is advanced and cut each time a print job is finished. The paper is advanced, but not cut each time a print job is finished. The paper is cut, but not advanced each time a print job is finished. Because of the space between the autocutter and the print head (1 to 2 cm, depends on the TM printer model), a minimum top margin is provided even if you set the top margin to 0 (zero). To avoid the waste, this setting allows you to print the top of the next page (e.g., store logos) on the bottom of the previous page and then cut the paper without advancing it. In this way, the top margin created by the physical space of the TM printer can be used. The paper is not advanced and not cut each time a print job is finished. The paper is advanced and cut each time a page is printed. The paper is advanced, but not cut each time a page is printed. The paper is cut, but not advanced each time a page is printed. Makes custom settings. When this setting is selected, the custom setting screen appears. 92
-
 1
1 -
2
-
3
-
4
-
5
-
6
-
7
-
8
-
9
-
10
-
11
-
12
-
13
-
14
-
15
-
16
-
17
-
18
-
19
-
20
-
21
-
22
-
23
-
24
-
25
-
26
-
27
-
28
-
29
-
30
-
31
-
32
-
33
-
34
-
35
-
36
-
37
-
38
-
39
-
40
-
41
-
42
-
43
-
44
-
45
-
46
-
47
-
48
-
49
-
50
-
51
-
52
-
53
-
54
-
55
-
56
-
57
-
58
-
59
-
60
-
61
-
62
-
63
-
64
-
65
-
66
-
67
-
68
-
69
-
70
-
71
-
72
-
73
-
74
-
75
-
76
-
77
-
78
-
79
-
80
-
81
-
82
-
83
-
84
-
85
-
86
-
 87
87 -
 88
88 -
 89
89 -
 90
90 -
 91
91 -
 92
92 -
 93
93 -
 94
94 -
 95
95 -
 96
96 -
 97
97 -
98
-
99
-
100
-
101
-
102
-
103
-
104
-
105
-
106
-
107
-
108
-
109
-
110
-
111
-
112
-
113
-
114
-
115
-
116
-
117
-
118
-
119
-
120
-
121
-
122
-
123
-
124
-
125
-
126
-
127
-
128
 |
 |
