Epson C31CA85090 Software User Guide - Page 81
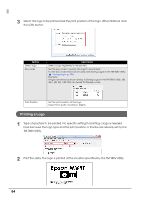
D Code. When finished, click the [OK] button., Click the [Apply] button to register the 2D Code.
 |
View all Epson C31CA85090 manuals
Add to My Manuals
Save this manual to your list of manuals |
Page 81 highlights
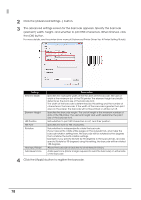
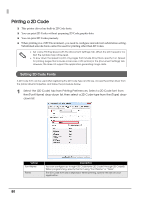
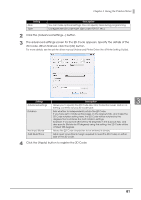
Chapter 3 Using the Printer Driver Setting Alias Type Description You can make optional settings. You can specify Alias during programming. Configures the 2D Code type. (QR Code, FDF417, etc.) 2 Click the [Advanced Settings...] button. 3 The advanced settings screen for the 2D Code appears. Specify the details of the 2D Code. When finished, click the [OK] button. For more details, see the printer driver manual (Advanced Printer Driver Ver. 4 Printer Setting Guide). Setting Description 3 Advanced settings Allows you to specify the 2D Code size, Error Correction Level, and so on. Setting contents vary by 2D Code type. Rotation Sets whether to independently rotate the 2D Code. If you have set to rotate entire pages on the [Layout] tab, and make the 2D Code rotation setting here, the 2D Code will be rotated by the degrees that combines the both rotation settings. Example: If you specify [Rotate by 90 degrees] in the [Layout] tab, and also specify [Rotate by 90 degrees] using this setting, the 2D Code will be rotated 180 degrees. Hex Input Mode Allows the 2D Code characters to be entered in binary. Add Quiet Zone Adds quiet zone (blank margin required to read the 2D Code) on either side of the 2D Code. 4 Click the [Apply] button to register the 2D Code. 81
-
 1
1 -
2
-
3
-
4
-
5
-
6
-
7
-
8
-
9
-
10
-
11
-
12
-
13
-
14
-
15
-
16
-
17
-
18
-
19
-
20
-
21
-
22
-
23
-
24
-
25
-
26
-
27
-
28
-
29
-
30
-
31
-
32
-
33
-
34
-
35
-
36
-
37
-
38
-
39
-
40
-
41
-
42
-
43
-
44
-
45
-
46
-
47
-
48
-
49
-
50
-
51
-
52
-
53
-
54
-
55
-
56
-
57
-
58
-
59
-
60
-
61
-
62
-
63
-
64
-
65
-
66
-
67
-
68
-
69
-
70
-
71
-
72
-
73
-
74
-
75
-
 76
76 -
 77
77 -
 78
78 -
 79
79 -
 80
80 -
 81
81 -
 82
82 -
 83
83 -
 84
84 -
 85
85 -
 86
86 -
87
-
88
-
89
-
90
-
91
-
92
-
93
-
94
-
95
-
96
-
97
-
98
-
99
-
100
-
101
-
102
-
103
-
104
-
105
-
106
-
107
-
108
-
109
-
110
-
111
-
112
-
113
-
114
-
115
-
116
-
117
-
118
-
119
-
120
-
121
-
122
-
123
-
124
-
125
-
126
-
127
-
128
 |
 |
