Epson ET-2760 Users Guide - Page 174
Caution, Parent topic, Related concepts, Cleaning and Transporting Your Product, Print Head Cleaning
 |
View all Epson ET-2760 manuals
Add to My Manuals
Save this manual to your list of manuals |
Page 174 highlights
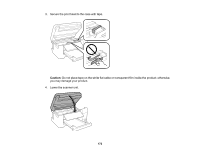
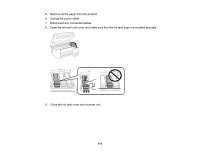
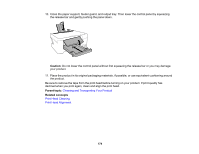
10. Close the paper support, feeder guard, and output tray. Then lower the control panel by squeezing the release bar and gently pushing the panel down. Caution: Do not lower the control panel without first squeezing the release bar or you may damage your product. 11. Place the product in its original packaging materials, if possible, or use equivalent cushioning around the product. Be sure to remove the tape from the print head before turning on your product. If print quality has declined when you print again, clean and align the print head. Parent topic: Cleaning and Transporting Your Product Related concepts Print Head Cleaning Print Head Alignment 174
-
 1
1 -
2
-
3
-
4
-
5
-
6
-
7
-
8
-
9
-
10
-
11
-
12
-
13
-
14
-
15
-
16
-
17
-
18
-
19
-
20
-
21
-
22
-
23
-
24
-
25
-
26
-
27
-
28
-
29
-
30
-
31
-
32
-
33
-
34
-
35
-
36
-
37
-
38
-
39
-
40
-
41
-
42
-
43
-
44
-
45
-
46
-
47
-
48
-
49
-
50
-
51
-
52
-
53
-
54
-
55
-
56
-
57
-
58
-
59
-
60
-
61
-
62
-
63
-
64
-
65
-
66
-
67
-
68
-
69
-
70
-
71
-
72
-
73
-
74
-
75
-
76
-
77
-
78
-
79
-
80
-
81
-
82
-
83
-
84
-
85
-
86
-
87
-
88
-
89
-
90
-
91
-
92
-
93
-
94
-
95
-
96
-
97
-
98
-
99
-
100
-
101
-
102
-
103
-
104
-
105
-
106
-
107
-
108
-
109
-
110
-
111
-
112
-
113
-
114
-
115
-
116
-
117
-
118
-
119
-
120
-
121
-
122
-
123
-
124
-
125
-
126
-
127
-
128
-
129
-
130
-
131
-
132
-
133
-
134
-
135
-
136
-
137
-
138
-
139
-
140
-
141
-
142
-
143
-
144
-
145
-
146
-
147
-
148
-
149
-
150
-
151
-
152
-
153
-
154
-
155
-
156
-
157
-
158
-
159
-
160
-
161
-
162
-
163
-
164
-
165
-
166
-
167
-
168
-
 169
169 -
 170
170 -
 171
171 -
 172
172 -
 173
173 -
 174
174 -
 175
175 -
 176
176 -
 177
177 -
 178
178 -
 179
179 -
180
-
181
-
182
-
183
-
184
-
185
-
186
-
187
-
188
-
189
-
190
-
191
-
192
-
193
-
194
-
195
-
196
-
197
-
198
-
199
-
200
-
201
-
202
-
203
-
204
-
205
-
206
-
207
-
208
-
209
-
210
-
211
-
212
-
213
-
214
-
215
-
216
-
217
-
218
-
219
-
220
-
221
-
222
-
223
-
224
-
225
-
226
-
227
-
228
-
229
-
230
-
231
-
232
-
233
-
234
-
235
-
236
-
237
 |
 |

174
10. Close the paper support, feeder guard, and output tray. Then lower the control panel by squeezing
the release bar and gently pushing the panel down.
Caution:
Do not lower the control panel without first squeezing the release bar or you may damage
your product.
11. Place the product in its original packaging materials, if possible, or use equivalent cushioning around
the product.
Be sure to remove the tape from the print head before turning on your product. If print quality has
declined when you print again, clean and align the print head.
Parent topic:
Cleaning and Transporting Your Product
Related concepts
Print Head Cleaning
Print Head Alignment