Epson LX-90 User Manual - Parallel 8620 PIC for LX-90 - Page 105
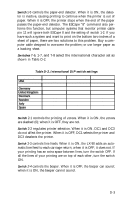
Switch 1, Table D-7. DIP switch functions
 |
View all Epson LX-90 manuals
Add to My Manuals
Save this manual to your list of manuals |
Page 105 highlights
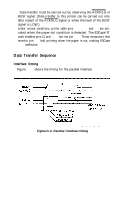
Always turn the power OFF (with the switch on the right side of the printer) before you change the setting of any of these switches. Any changes made while the power is on will be ignored until you turn the printer off and back on. So set all switches with the power off. Table D-l shows you the functions of all the switches, and the rest of the appendix explains each of them. Table D-7. DIP switch functions Switch 1 See Table D-2. Switch 2 No. ON Function 2-1 0 (slashed) Zero character 2-2 Inactive Printer select 2-3 CR + LF Automatic line feed 2-4 Mute Beeper Note: The factory setting of all these switches is OFF: OFF 0 Active CR only Active Switch 1-1 selects pica or compressed printing. ON is compressed; OFF is pica. Regardless of the setting, you can still select compressed with SelecType and either compressed or pica with ESCape codes. Switch Z-2 selects draft or Near Letter Quality. When it is ON, the printer prints in the NLQ mode. When it is OFF, it prints in the draft mode. If the switch is off, you can still select the NLQ mode with SelecType or an ESCape code. Switch l-3 controls the optional cut-sheet feeder, a device that automatically loads single sheets of paper into the printer. When it is ON, the cut-sheet feeder is enabled. When it is OFF, the cut-sheet feeder is disabled. Keep it off unless you are using a cut-sheet feeder. Switch 1-4 selects the paper length. When it is OFF, the length is 11"; when it is ON, the length is 12". D-2
-
 1
1 -
2
-
3
-
4
-
5
-
6
-
7
-
8
-
9
-
10
-
11
-
12
-
13
-
14
-
15
-
16
-
17
-
18
-
19
-
20
-
21
-
22
-
23
-
24
-
25
-
26
-
27
-
28
-
29
-
30
-
31
-
32
-
33
-
34
-
35
-
36
-
37
-
38
-
39
-
40
-
41
-
42
-
43
-
44
-
45
-
46
-
47
-
48
-
49
-
50
-
51
-
52
-
53
-
54
-
55
-
56
-
57
-
58
-
59
-
60
-
61
-
62
-
63
-
64
-
65
-
66
-
67
-
68
-
69
-
70
-
71
-
72
-
73
-
74
-
75
-
76
-
77
-
78
-
79
-
80
-
81
-
82
-
83
-
84
-
85
-
86
-
87
-
88
-
89
-
90
-
91
-
92
-
93
-
94
-
95
-
96
-
97
-
98
-
99
-
 100
100 -
 101
101 -
 102
102 -
 103
103 -
 104
104 -
 105
105 -
 106
106 -
 107
107 -
 108
108 -
 109
109 -
 110
110 -
111
-
112
-
113
-
114
-
115
-
116
-
117
-
118
-
119
-
120
-
121
-
122
 |
 |
