Epson LX-90 User Manual - Parallel 8620 PIC for LX-90 - Page 43
CHAP 7-USER-DEFINED CHARACTERS, Defining Your Own Characters
 |
View all Epson LX-90 manuals
Add to My Manuals
Save this manual to your list of manuals |
Page 43 highlights
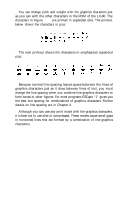
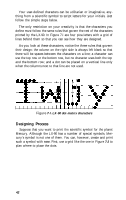
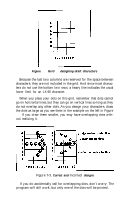
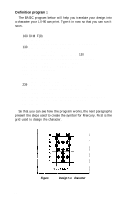
Chapter 7 User-Defined Characters The LX-90 has several hundred different characters stored in its Read Only Memory. Although this number includes draft, Near Letter Quality, international, and graphics characters, sometimes you would like to have a few more. For those occasions when you need a special character or a few letters in a different typeface, the LX-90 allows you to create your own characters and print them just as if they were ordinary letters. Defining Your Own Characters The printout below displays two such characters to give you an idea of what can be done, but remember that you can create whatever you need or want. It may seem that designing a character and telling the LX-90 how to print it would be extremely complicated, but in this chapter the task is reduced to a simple three-step process: planning your character, running one program that tests your work and calculates the required DATA numbers, and running another program to put the character in your printer's Random Access Memory (RAM) for use whenever you need it. Because the high-resolution NLQ (Near Letter Quality) mode uses many more dots per character than the draft mode, defining NLQ characters is somewhat more complex than defining draft characters. You will find the programs for defining NLQ characters at the end of this chapter. After you have created your own characters, you can re-program seldom-used keys to generate the user-defined characters. For example, you will be able to type ( to print 41
-
 1
1 -
2
-
3
-
4
-
5
-
6
-
7
-
8
-
9
-
10
-
11
-
12
-
13
-
14
-
15
-
16
-
17
-
18
-
19
-
20
-
21
-
22
-
23
-
24
-
25
-
26
-
27
-
28
-
29
-
30
-
31
-
32
-
33
-
34
-
35
-
36
-
37
-
 38
38 -
 39
39 -
 40
40 -
 41
41 -
 42
42 -
 43
43 -
 44
44 -
 45
45 -
 46
46 -
 47
47 -
 48
48 -
49
-
50
-
51
-
52
-
53
-
54
-
55
-
56
-
57
-
58
-
59
-
60
-
61
-
62
-
63
-
64
-
65
-
66
-
67
-
68
-
69
-
70
-
71
-
72
-
73
-
74
-
75
-
76
-
77
-
78
-
79
-
80
-
81
-
82
-
83
-
84
-
85
-
86
-
87
-
88
-
89
-
90
-
91
-
92
-
93
-
94
-
95
-
96
-
97
-
98
-
99
-
100
-
101
-
102
-
103
-
104
-
105
-
106
-
107
-
108
-
109
-
110
-
111
-
112
-
113
-
114
-
115
-
116
-
117
-
118
-
119
-
120
-
121
-
122
 |
 |
