Epson Perfection 1200U Photo User Manual - TWAIN - Page 19
Scanner Basics, Adjusting Source and, Target Image Sizes, Previewing Your Scan, Advanced Scanning - specifications
 |
View all Epson Perfection 1200U Photo manuals
Add to My Manuals
Save this manual to your list of manuals |
Page 19 highlights
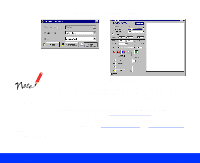
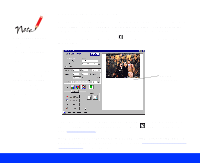
With applications that let you select ICM, sRGB, or ColorSync profiles for your printer, you'll get great printed output when you scan using ICM/sRGB (Windows 98) or ColorSync (Macintosh). See Configuring Preview and Color Options for details. 4 The Image Type and Destination settings you choose automatically select the correct Resolution setting for your image. If you need to change the resolution, click Advanced to open the Advanced window, if necessary. Then select a new setting from the Resolution list. The available resolutions range from 50 to 9600 dpi (dots per inch). You can also type in a specific Resolution setting, such as 1600 or 2400 dpi for enlargements, if it's not in the list. If you enlarge your target image size by scaling or by selecting a larger Target size, be sure to increase the Resolution setting by the same proportion to retain your image quality. See Adjusting Source and Target Image Sizes for more information. For additional information on selecting scanning resolution, see your Scanner Basics book. 5 It's a good idea to preview your image before you actually scan so you can make any necessary changes. To preview your image, click Advanced to open the Advanced window, if necessary. Then see Previewing Your Scan for preview instructions. See Advanced Scanning for information on the rest of the TWAIN settings in the window. 6 When you're ready to scan, click the Scan button. The scanned image appears in your application window. 7 Click the Close button to close the EPSON TWAIN window and return to your application. To modify or save your scanned image using your application software, see your software documentation. Basic Scanning Page 19
-
 1
1 -
2
-
3
-
4
-
5
-
6
-
7
-
8
-
9
-
10
-
11
-
12
-
13
-
 14
14 -
 15
15 -
 16
16 -
 17
17 -
 18
18 -
 19
19 -
 20
20 -
 21
21 -
 22
22 -
 23
23 -
 24
24 -
25
-
26
-
27
-
28
-
29
-
30
-
31
-
32
-
33
-
34
-
35
-
36
-
37
-
38
-
39
-
40
-
41
-
42
-
43
-
44
-
45
-
46
-
47
-
48
-
49
-
50
-
51
-
52
-
53
-
54
-
55
-
56
-
57
-
58
-
59
-
60
-
61
-
62
-
63
-
64
-
65
-
66
-
67
-
68
-
69
-
70
-
71
-
72
-
73
-
74
-
75
-
76
-
77
-
78
-
79
-
80
-
81
-
82
-
83
-
84
-
85
-
86
-
87
-
88
-
89
-
90
-
91
-
92
-
93
-
94
-
95
-
96
-
97
-
98
-
99
-
100
-
101
-
102
-
103
 |
 |
