Epson PictureMate Snap - PM 240 Product Information Guide - Page 11
Using the Optional Battery, Storing and Displaying PictureMate Prints, Installing the Battery - buy
 |
View all Epson PictureMate Snap - PM 240 manuals
Add to My Manuals
Save this manual to your list of manuals |
Page 11 highlights
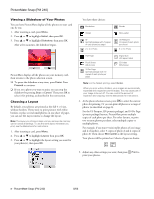
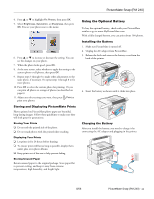
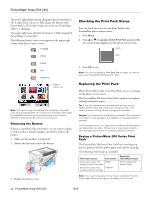
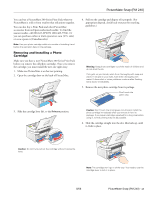
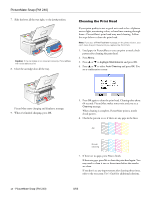
PictureMate Snap (PM 240) 4. Press or to highlight Fix Photos, then press OK. 5. Select Brightness, Saturation, or Sharpness, then press OK. You see your photo next to the menu: 6. Press or to increase or decrease the setting. You can see the changes on your photo. 7. When the photo looks good, press OK. 8. At the next screen, select whether to apply the setting to the current photo or all photos, then press OK. 9. Repeat steps 3 through 8 to make other adjustments to the same photo, if necessary. Or repeat steps 1 through 8 to fix more photos. 10. Press OK to select the current photo for printing. Or you can print all photos or a range of photos (as described on page 6). 11. Adjust any other settings you want, then press Print to print your photos. Storing and Displaying PictureMate Prints Photos printed on PictureMate photo paper are beautiful, long-lasting images. Follow these guidelines to make sure they will look great for generations. Storing Your Prints ❏ Do not rub the printed side of the photo. ❏ Do not stack photos with the printed sides touching. Displaying Your Prints ❏ Let prints sit for 24 hours before framing. ❏ To ensure prints will last as long as possible, display them under glass or in photo albums. ❏ Keep prints out of the sun to help prevent fading. Storing Unused Paper Return unused paper to the original package. Store paper flat to prevent curling, and keep it away from extreme temperatures, high humidity, and bright light. Using the Optional Battery To buy the optional battery, check with your PictureMate retailer or go to www.MyPictureMate.com. With a fully charged battery, you can print about 100 photos. Installing the Battery 1. Make sure PictureMate is turned off. 2. Unplug the AC adapter from PictureMate. 3. Release the latch and remove the battery cover from the back of the printer. 4. Insert the battery as shown until it clicks into place. Charging the Battery After you install the battery, you need to charge it by connecting the AC adapter and plugging in the printer. 8/06 PictureMate Snap (PM 240) - 11
-
 1
1 -
2
-
3
-
4
-
5
-
 6
6 -
 7
7 -
 8
8 -
 9
9 -
 10
10 -
 11
11 -
 12
12 -
 13
13 -
 14
14 -
 15
15 -
 16
16
 |
 |
