Epson PictureMate Snap - PM 240 Product Information Guide - Page 9
Cropping, Red-Eye Removal, Adding a Date Stamp, Printing Photos in Black-and-White or, Sepia
 |
View all Epson PictureMate Snap - PM 240 manuals
Add to My Manuals
Save this manual to your list of manuals |
Page 9 highlights
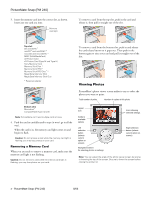
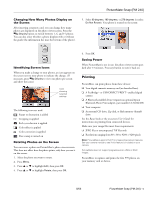
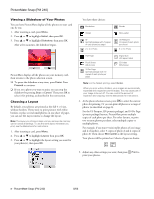
PictureMate Snap (PM 240) Cropping You can print just part of a photo, cropping out the area that you don't want. The part you keep is automatically enlarged to fit the page. (Cropping affects only your printed photo, not your original image.) 1. Select the photo you want to crop. 2. Press Menu. 3. Press or to highlight Edit, then press OK. 4. Press or to highlight Crop Photo, then press OK. You see a blue box around the photo: This indicates the area that will print; the area outside the box will be cropped. 5. Set the area you want to print: ❏ Press Zoom In to crop more of the photo. ❏ Press Zoom Out to crop less of the photo. ❏ Press , , , or to move the blue box to a different part of your photo. ❏ Press Display to rotate the blue box. 6. Press OK. You see a close-up of your photo with the crop setting you selected. 7. Press OK to select the cropped photo for printing. 8. If you want to crop additional photos, repeat steps 1 through 7. 9. Adjust any other settings you want, then press Print to print your photos. Red-Eye Removal When you take photos of people, they sometimes appear to have red eyes. You can use red-eye reduction to help eliminate this problem. Note: Red-eye reduction may not correct red eyes in all photos. The Red-Eye Reduction setting is kept until you remove the memory card or cancel all settings. To use red-eye reduction whenever you print, see the Basics book. 1. Select a photo with the red-eye problem. 2. Press Menu. 3. Press or to highlight Edit, then press OK. 4. Press or to highlight Red-Eye Reduction, then press OK. 5. Highlight On to turn on the setting, then press OK. 6. At the next screen, select whether to apply the setting to the current photo or all photos, then press OK. Adding a Date Stamp You can add the date your photos were originally taken to the bottom right corner of each photo. Note: The date comes from your camera, not from the printer. If this information is incorrect, adjust the date setting on your camera. 1. Press Menu. 2. Press or to highlight Setup, then press OK. 3. Press or to highlight Date Stamp, then press OK. 4. Highlight On, then press OK. Note: If a card is already inserted, you need to remove it and reinsert it before the setting takes effect. (Or press Cancel and select Yes to cancel all settings.) Your photos are automatically date-stamped until you turn off the setting. Printing Photos in Black-and-White or Sepia You can print pictures in black-and-white or in a sepia tone (like an old-fashioned photo) even when the originals are in color. Your original images are not changed. Note: The color effect you choose is kept until you remove the memory card or cancel all settings. To use the same color effect whenever you print, see the Basics book. 1. Select a photo to print black-and-white or sepia. 2. Press Menu. 3. Press or to highlight Edit, then press OK. 8/06 PictureMate Snap (PM 240) - 9
-
 1
1 -
2
-
3
-
 4
4 -
 5
5 -
 6
6 -
 7
7 -
 8
8 -
 9
9 -
 10
10 -
 11
11 -
 12
12 -
 13
13 -
 14
14 -
15
-
16
 |
 |
